20. HPM5E00EVK Web Control System
20.1. Overview
The HPM5E00EVK Web Control System is an embedded web server project based on the HPMicro HPM5E00 RISC-V microcontroller. This project uses USB RNDIS virtual network card technology to enable browser-based access and control of the development board without requiring an external network connection.
20.1.1. Key Features
USB RNDIS Networking - Virtual Ethernet over USB, plug-and-play
Embedded Web Server - Lightweight HTTP server based on Mongoose
Real-time Control Interface - Modern Web UI built with Preact
Digital Input Monitoring - Real-time display of 6-channel button states
Segment Display Control - Control single 8-segment LED display via Web interface
RESTful API - Standardized HTTP API endpoints
20.1.2. Technology Stack
Backend (web_server/)
RTOS: FreeRTOS
Network Stack: LwIP (Lightweight TCP/IP stack)
USB Protocol: CherryUSB RNDIS device class
Web Server: Mongoose (Embedded HTTP server)
Peripheral Control: EUI (Extended User Interface) - LED display and key matrix
Frontend (web_app/)
Framework: Preact (Lightweight React alternative)
Build Tool: Vite
Styling: Tailwind CSS
Packaging: Built and converted to C array embedded in firmware
20.2. Project Structure
HPM5E00-Web/
├── web_server/               # Embedded server code
│   ├── app/                  # Application main program
│   │   ├── main.c           # Program entry point
│   │   ├── init.c/.h        # Hardware and network initialization
│   │   ├── tasks.c/.h       # FreeRTOS task management
│   │   └── interrupts.c/.h  # Interrupt service routines
│   ├── button/              # Button and LED display control
│   │   └── button.c/.h      # EUI peripheral driver
│   ├── net/                 # Network services
│   │   └── net.c/.h         # Mongoose HTTP server and APIs
│   ├── rndis/               # USB RNDIS device
│   │   └── cdc_rndis_device.c/.h
│   ├── fs/                  # Embedded file system
│   │   └── packed_fs.c      # Packed frontend resources
│   ├── config/              # Configuration files
│   │   ├── FreeRTOSConfig.h
│   │   ├── lwipopts.h       # LwIP configuration
│   │   └── mongoose_config.h
│   └── common/              # Common components
│       ├── arch/            # LwIP architecture adaptation
│       ├── dhcp-server/     # DHCP server
│       ├── dns-server/      # DNS server
│       └── mongoose/        # Mongoose source code
├── web_app/                 # Web frontend application
│   ├── src/
│   │   ├── app.jsx          # Main application component
│   │   ├── pages/
│   │   │   └── Welcome.jsx  # Main page
│   │   └── assets/          # Static resources
│   ├── dist/                # Build output directory
│   └── package.json
├── tools/                   # Utility scripts
│   ├── build_and_pack_full.bat  # One-click build and pack script
│   └── make_packed_fs.py    # Frontend resource packing tool
└── doc/                     # Documentation
20.3. Quick Start
20.3.1. Hardware Requirements
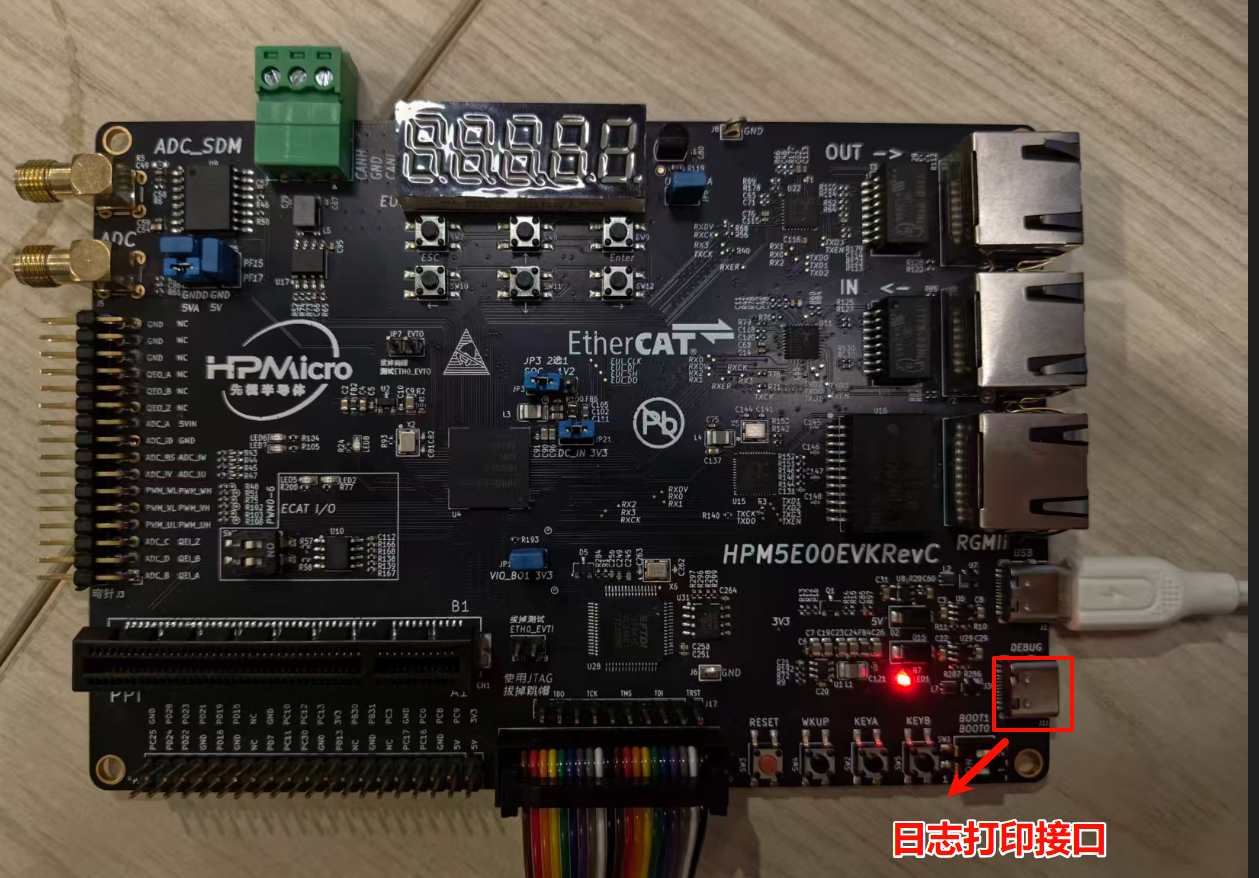
HPM5E00EVK Development Board
USB cable (for PC connection)
(Optional) Debugger (for firmware flashing and debugging)
20.3.2. Software Requirements
Backend Development
Segger Embedded Studio (SES)
HPM SDK v1.10.0
CMake 3.13+
Frontend Development
Node.js 16+
npm or yarn
20.3.3. Development Board Connection
20.3.4. Build Project

20.3.5. Compile and Run
20.3.5.1. 1. Build Frontend Application
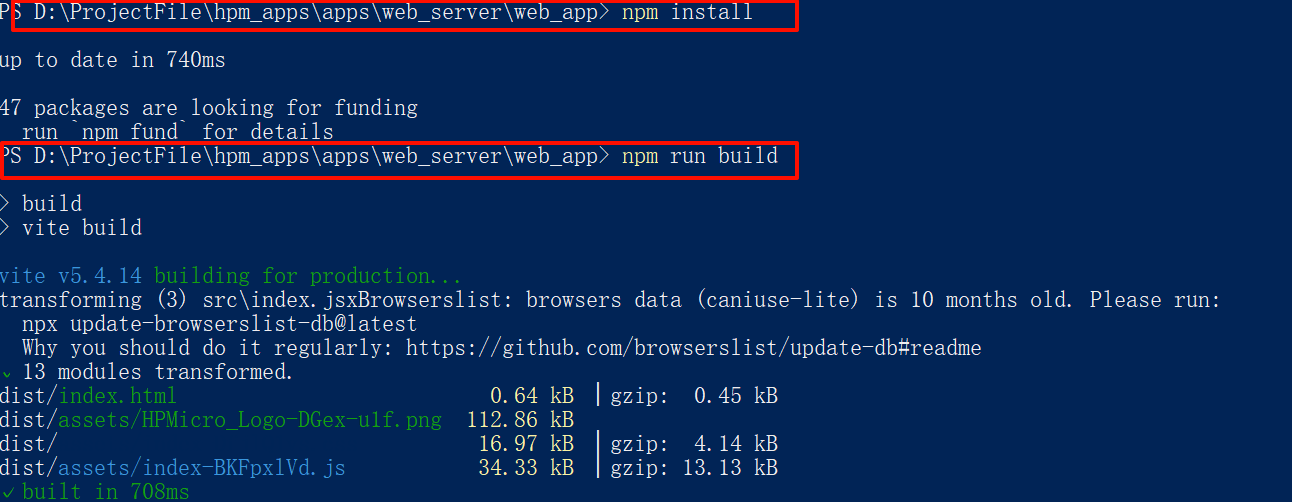
Right-click in the web_app folder and select “Open Windows PowerShell”
npm install
npm run build
20.3.5.2. 2. Pack Frontend Resources to C File
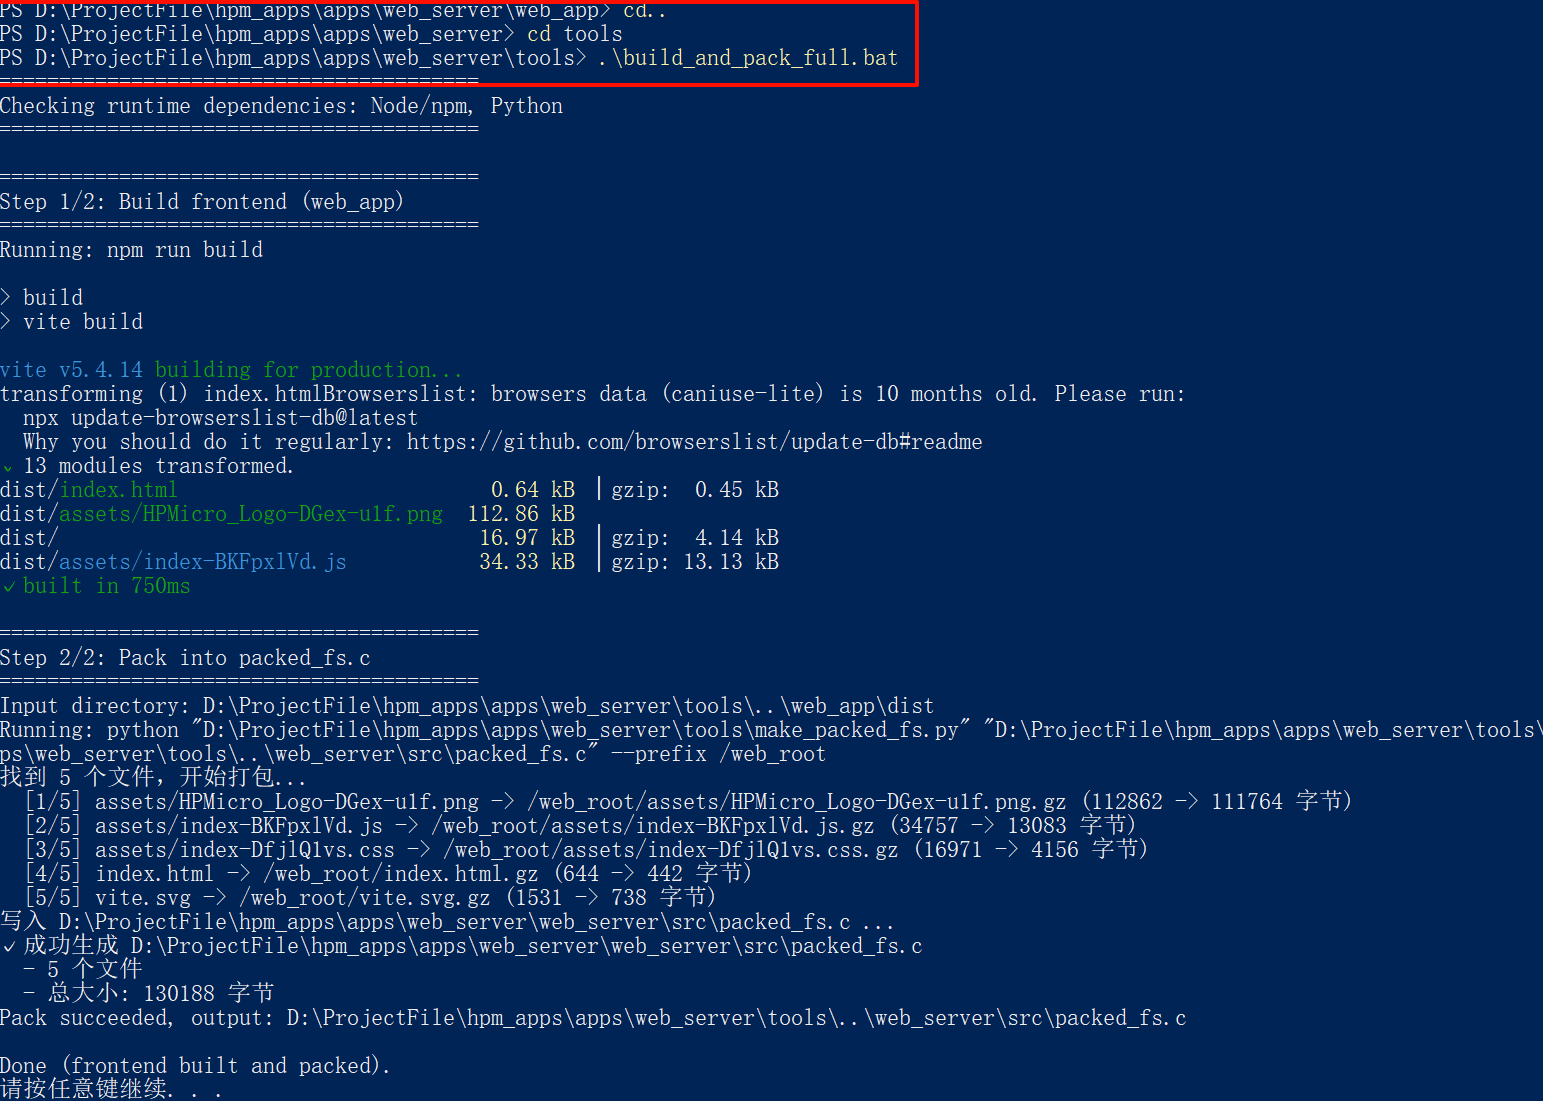
Use the one-click script:
cd ..
cd tools
build_and_pack_full.bat
20.3.5.3. 3. Compile Firmware
Open project in SES:
20.3.5.4. 4. Flash and Run
Flash the firmware to the HPM5E00EVK development board
Connect the board to PC via USB. Note: Use the USB port; the debug port is for log printing
PC will recognize the virtual network adapter and automatically obtain an IP address (192.168.7.x)
Open browser and visit:
http://192.168.7.1:8000
20.4. Runtime Behavior
20.4.1. LOG
without open Web
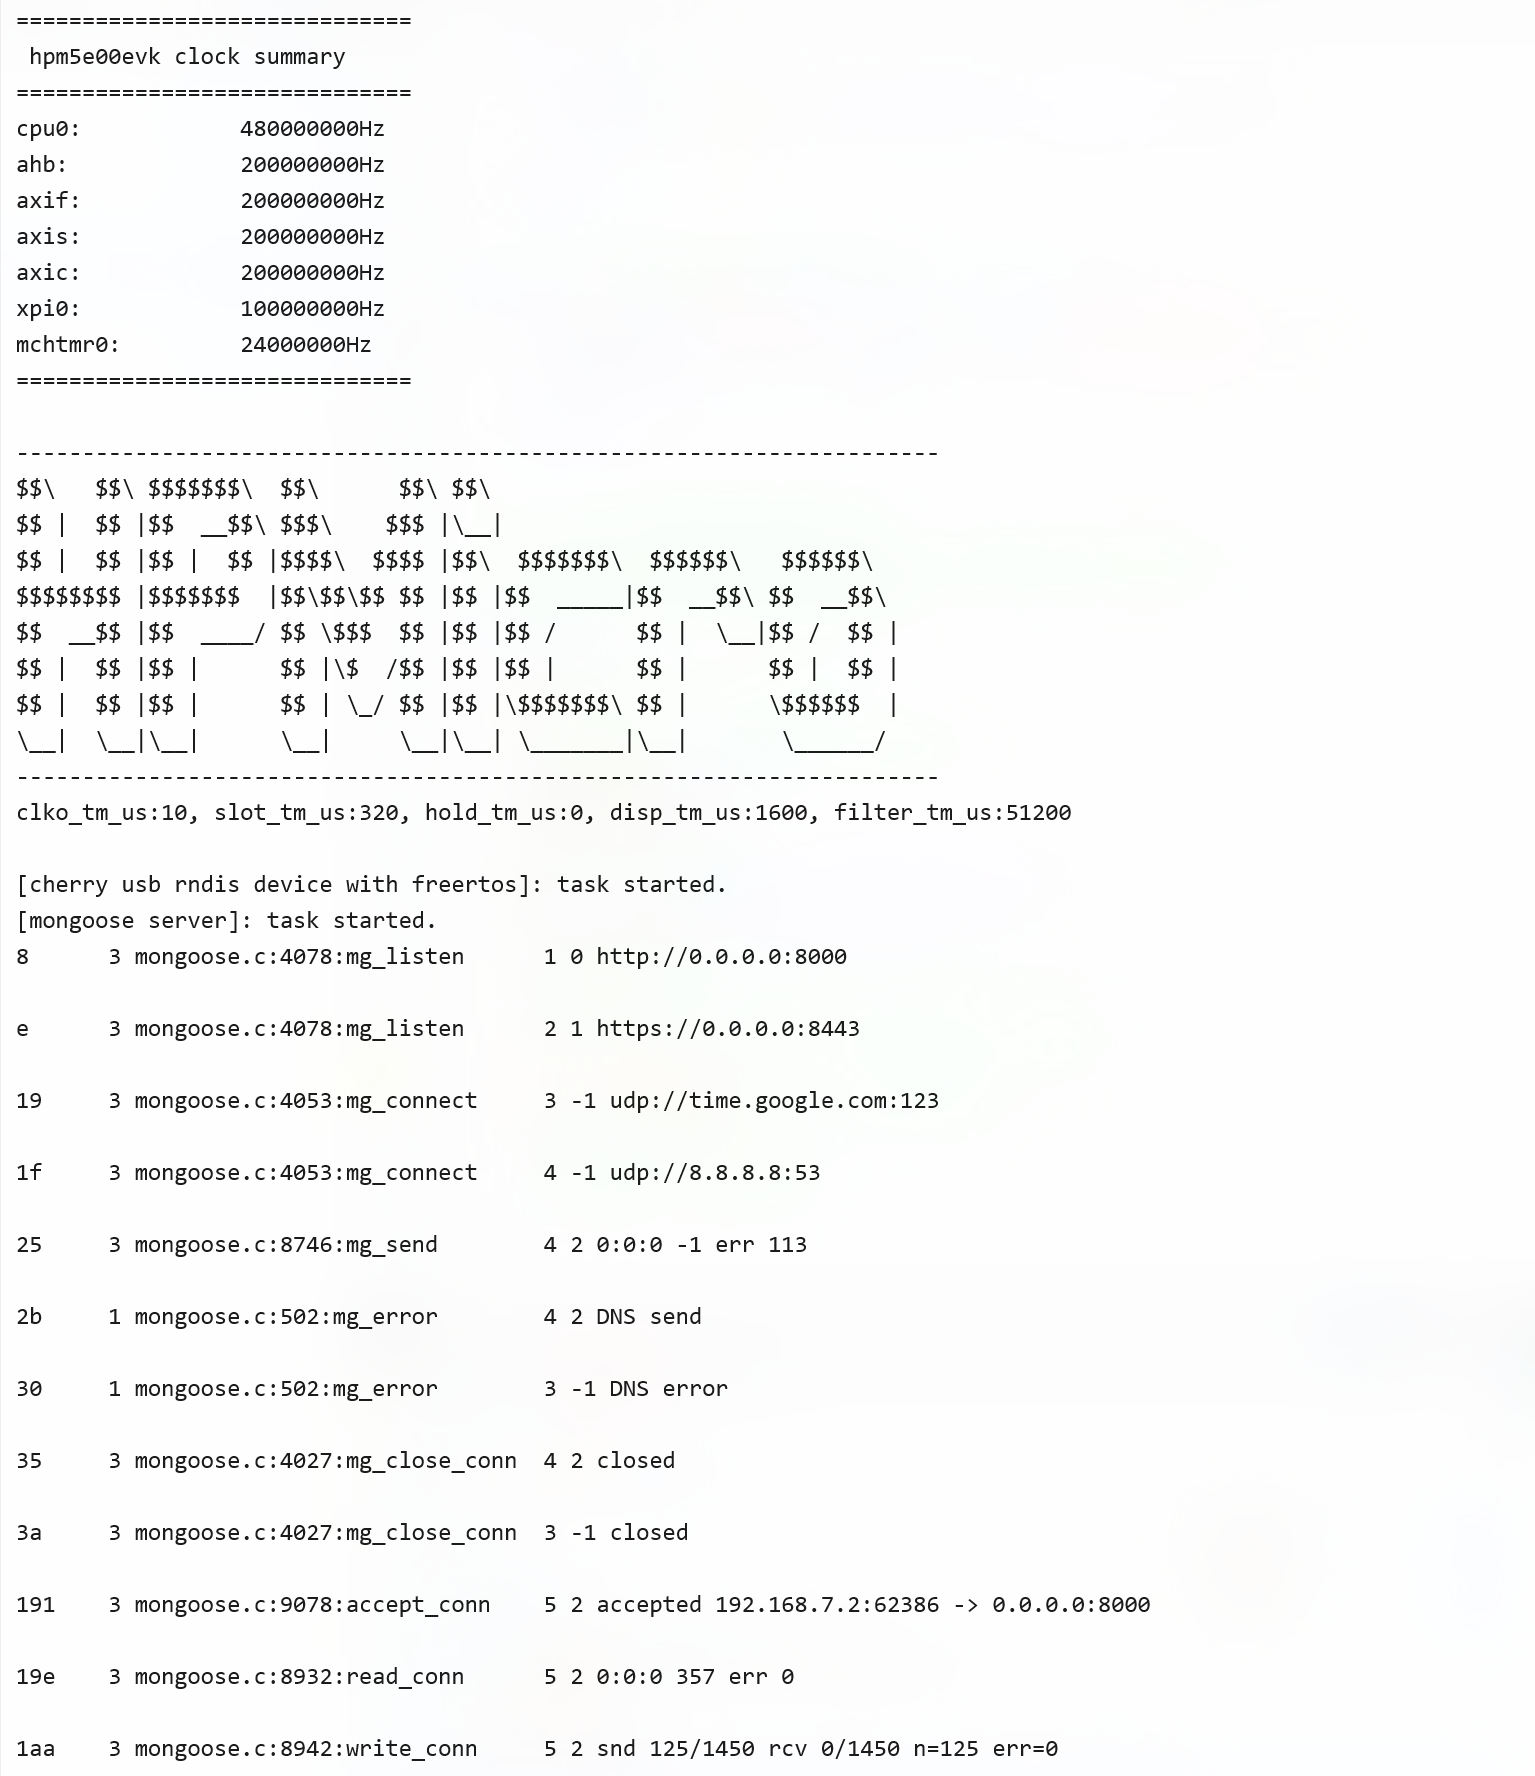 open Web

20.4.2. Web Interface Features
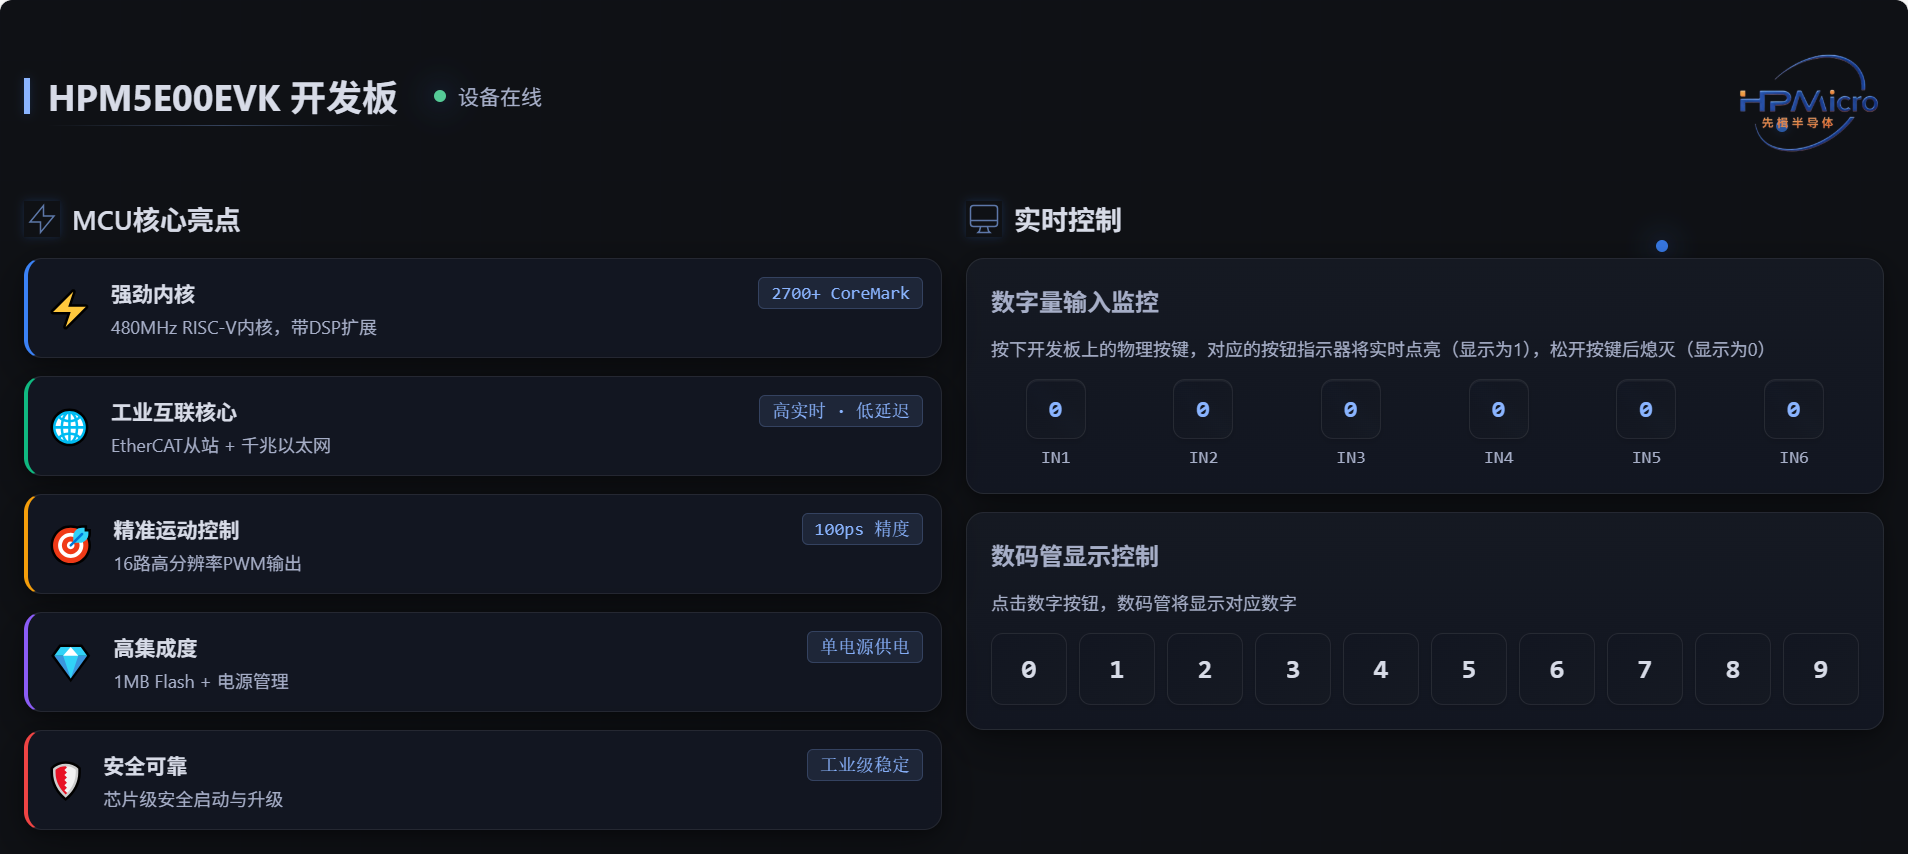
Device Status Display
Top-left shows “HPM5E00EVK Development Board” and online status
Status indicator is green and flashing when online
MCU Core Highlights
Displays 5 feature cards: Powerful Core, Industrial Interconnection Core, Precision Motion Control, High Integration, Secure & Reliable
Scanning line animation effect on hover
Digital Input Monitoring
Real-time display of 6-channel button states (IN1-IN6)
When pressing physical buttons on the board, corresponding button indicators light up in real-time (displays as 1)
Turns off when button released (displays as 0)
Update period: 200ms
Segment Display Control
Provides 10 digit buttons (0-9)
Clicking a digit button displays the corresponding number on the board’s segment display
Button highlights for 1 second after clicking
20.4.3. Serial Output
Connect serial debug terminal (115200, 8N1) to see:
Web Server Starting...
IP Address: 192.168.7.1
HTTP Server: http://192.168.7.1:8000
Button press information is output when buttons are pressed.
20.5. API Endpoints
20.5.1. 1. Heartbeat
GET /api/heartbeat
Response: {"status": "ok", "uptime": 12345}
20.5.2. 2. Digital Input Status
GET /api/di
Response: {"digitalInputs": 5}  // Bitmask, bit0-bit5 correspond to IN1-IN6
20.5.3. 3. EtherCAT Data
GET /api/ethercat/data
Response: {
  "digitalInputs": 5,
  "digitalOutputs": 0,
  "syncPeriod": 0,
  "syncMode": "FreeRun",
  "slaveALStatus": "INIT"
}
20.5.4. 4. Segment Display Control
POST /api/segment-display
Content-Type: application/json
Body: {"digit": 5}  // Display digit 0-9
Response: {"status": "ok"}
20.6. Network Configuration
Device IP Address: 192.168.7.1
Subnet Mask: 255.255.255.0
HTTP Port: 8000
DHCP Server: Automatically assigns IP addresses from 192.168.7.2-192.168.7.254 to PC
DNS Server: Built-in DNS server resolves all domains to 192.168.7.1
20.7. Troubleshooting
20.7.1. PC Cannot Obtain IP Address
Check if USB connection is normal
Check if RNDIS device appears in Device Manager
Manually set PC network adapter IP to 192.168.7.2, subnet mask 255.255.255.0
20.7.2. Cannot Access Web Interface
Confirm device IP is 192.168.7.1
Check firewall settings
Try
ping 192.168.7.1to test connectivity
20.8. Notes
While the firmware is running, the PC may be disconnected from the internet. To restore normal internet access on the PC, disconnect the USB cable from the development board.