13. hpm_monitor服务使用例程
13.1. 依赖SDK1.11.0
13.2. 介绍
hpm_monitor 是一个高效的、易用的、可移植性高的服务,用于实时查看和设置设备中的全局变量,以及高速上报全局变量。常被用作监控数据示波器,对电机、电源等调试非常友好。
注意:hpm_monitor服务 需搭配PC上位机HPMicroMonitorStudio工具使用;
HPMicroMonitorStudio从先楫半导体官网获取下载。
为了方便用户使用、了解hpm_monitor服务,本文为hpm_monitor服务使用的demo。
本例程软件实现了4中波形:三角波、正弦波、方波、锯齿波;新增了通过用户自定义通道上报单个和数组数据;可通过hpm_monitor服务搭配上位机实时查看此波形,同时也可以设置下发修改波形数据。
13.3. hpm_monitor服务启用
cmakelist.txt使能hpm_monitor服务 set(CONFIG_A_HPMMONITOR 1) 使能hpm_monitor服务 set(CONFIG_MONITOR_INTERFACE “uart”) 使用UART通道 set(CONFIG_MONITOR_INTERFACE “usb”) 使用USB通道 set(CONFIG_MONITOR_INTERFACE “enet”) 使用ENET通道
set(CONFIG_A_HPMMONITOR 1)
# set(CONFIG_MONITOR_INTERFACE "uart")
set(CONFIG_MONITOR_INTERFACE "usb")
# set(CONFIG_MONITOR_INTERFACE "enet")

if("${CONFIG_MONITOR_INTERFACE}" STREQUAL "uart")

elseif("${CONFIG_MONITOR_INTERFACE}" STREQUAL "usb")
    set(CONFIG_CHERRYUSB 1)
    set(CONFIG_USB_DEVICE 1)
    set(CONFIG_USB_DEVICE_CDC 1)
elseif("${CONFIG_MONITOR_INTERFACE}" STREQUAL "enet")
    set(CONFIG_LWIP 1)
    set(CONFIG_ENET_PHY 1)
    set(APP_USE_ENET_PORT_COUNT 1)
    #set(APP_USE_ENET_ITF_RGMII 1)
    #set(APP_USE_ENET_ITF_RMII 1)
    #set(APP_USE_ENET_PHY_DP83867 1)
    #set(APP_USE_ENET_PHY_RTL8211 1)
    #set(APP_USE_ENET_PHY_DP83848 1)
    #set(APP_USE_ENET_PHY_RTL8201 1)
    if(NOT DEFINED APP_USE_ENET_PORT_COUNT)
        message(FATAL_ERROR "APP_USE_ENET_PORT_COUNT is undefined!")
    endif()

    if(NOT APP_USE_ENET_PORT_COUNT EQUAL 1)
        message(FATAL_ERROR "This sample supports only one Ethernet port!")
    endif()

    if (APP_USE_ENET_ITF_RGMII AND APP_USE_ENET_ITF_RMII)
        message(FATAL_ERROR "This sample doesn't support more than one Ethernet phy!")
    endif()
endif()

find_package(hpm-sdk REQUIRED HINTS $ENV{HPM_SDK_BASE})

if("${CONFIG_MONITOR_INTERFACE}" STREQUAL "uart")
    sdk_compile_definitions("-DCONFIG_UART_CHANNEL=1")
    sdk_compile_definitions("-DCONFIG_USE_CONSOLE_UART=1")
    sdk_compile_definitions("-DCONFIG_MONITOR_DBG_LEVEL=0")
elseif("${CONFIG_MONITOR_INTERFACE}" STREQUAL "usb")
    sdk_compile_definitions("-DCONFIG_USB_CHANNEL=1")
elseif("${CONFIG_MONITOR_INTERFACE}" STREQUAL "enet")
    sdk_compile_definitions("-DCONFIG_ENET_CHANNEL=1")
    sdk_inc(inc/enet)
endif()
调用初始化monitor_init()和轮询monitor_handle(),即可完成服务启用;
int main(void)
{
    uint64_t time = 0;
    uint32_t index1, index2;
    board_init();
    board_init_led_pins();
    printf("general debug demo!\r\n");
    printf("__DATE__:%s, __TIME__:%s\r\n", __DATE__, __TIME__);

    monitor_init();
    board_timer_create(10, timer_cb);

    index1 = 0;
    index2 = 0;
    while (1)
    {
        if(tick_time_ms_read32() - time >= 10)
        {
            time = tick_time_ms_read32();
            triangule_wave_handle();
            sine_wave_handle();
            square_ware_handle();
            sawtooth_ware_handle();
            test_square_array[index1++] = test_square_ware;
            test_sine_array[index2++] = test_sine_wave;
            if(index1 >= 1024)
            {
                index1 = 0;
                monitor_channel_report_array(2, test_square_array, 1024);
            }
            if(index2 >= 1024)
            {
                index2 = 0;
                monitor_channel_report_array(3, test_sine_array, 1024);
            }
        }
        monitor_handle();
    }
    return 0;
}
用户自定义通道
MONITOR_DEFINE_GLOBAL_VAR(ch_signal_float_triangule, 0, float, 100, 0);
MONITOR_DEFINE_GLOBAL_VAR(ch_signal_float_sawtooth, 1, float, 100, 0);
MONITOR_DEFINE_GLOBAL_VAR(ch_array_int_square, 2, int32_t, 100, 1024);
MONITOR_DEFINE_GLOBAL_VAR(ch_array_float_sine, 3, float, 100, 1024);

void timer_cb(void)
{
    monitor_channel_add_data(0, &test_triangule_wave);
    monitor_channel_add_data(1, &test_sawtooth_ware);
    board_led_toggle();
}

while (1)
{
   if(tick_time_ms_read32() - time >= 10)
   {
      time = tick_time_ms_read32();
      triangule_wave_handle();
      sine_wave_handle();
      square_ware_handle();
      sawtooth_ware_handle();
      test_square_array[index1++] = test_square_ware;
      test_sine_array[index2++] = test_sine_wave;
      if(index1 >= 1024)
      {
            index1 = 0;
            monitor_channel_report_array(2, test_square_array, 1024);
      }
      if(index2 >= 1024)
      {
            index2 = 0;
            monitor_channel_report_array(3, test_sine_array, 1024);
      }
   }
   monitor_handle();
}
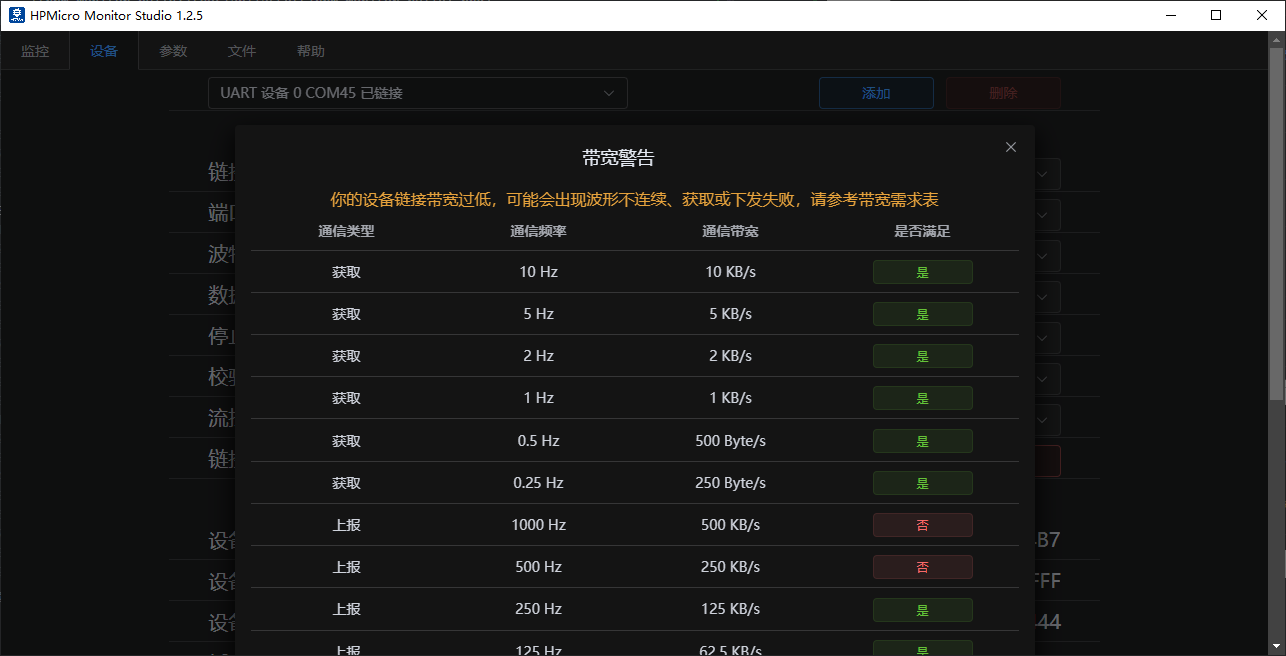
monitor_config.h 配置 注意: 1.建议增大UART通信波特率(2M及以上)。低速率通信波特率在高速率上报频率下,会导致概率上报失败或设置失败; 2.针对电机、电源高实时性要求,避免其它中断影响电机、电源电流环等运行,建议关闭monitor通信通道中断,如USB使用轮询方式(使能#define CONFIG_USB_POLLING_ENABLE);
//PID VID配置
#define MONITOR_PID                  (0xFFFF)
#define MONITOR_VID                  (0x34B7) /* HPMicro VID */

//协议最大数据包设置
#define MONITOR_PROFILE_MAXSIZE      (4096)

//monitor内存池大小
#define MONITOR_MEM_SIZE             (40*1024)

//打印日志等级设置
#define CONFIG_MONITOR_DBG_LEVEL MONITOR_DBG_INFO

#if defined(CONFIG_UART_CHANNEL) && CONFIG_UART_CHANNEL
//UART通道相关配置
...
#endif

#if defined(CONFIG_USB_CHANNEL) && CONFIG_USB_CHANNEL
//USB通道 相关配置
//使能USB 轮询模式,关闭USB中断,避免影响主程序高实时性外设
#define CONFIG_USB_POLLING_ENABLE
...
#endif

#if defined(CONFIG_ENET_CHANNEL) && CONFIG_ENET_CHANNEL
//ENET通道相关配置
...
#endif
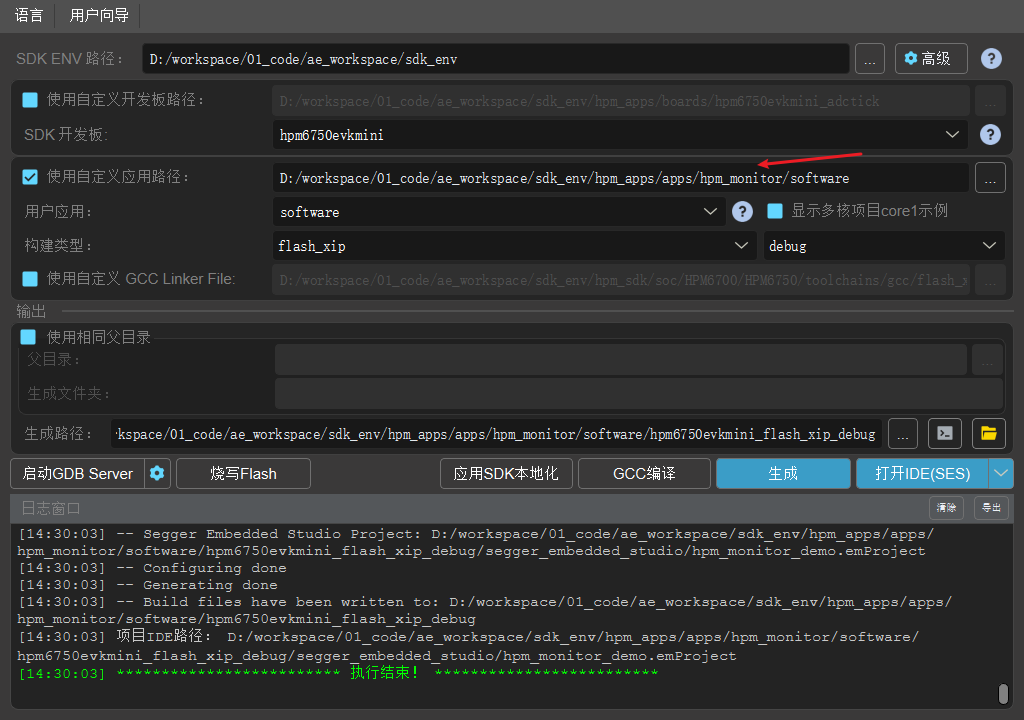
13.4. 工程路径
工程路径:hpm_monitor/software
13.5. 工程配置
无
13.6. 工程构建
当前工程支持HPM 全系列MCU及board,用户根据需求选择对应的board即可。
工程构建类型任意都可以。
如下windows构建工程。
13.7. 工程运行
注:HPMicro_Monitor_Studio详细操作文档请查看HPMicro_Monitor_Studio帮助文档;本文只按照运行步骤介绍基础功能;
烧录运行工程
根据选择的通信通道,设备(EVK)连接电脑(UART/USB)
PC双击运行HPMicro_Monitor_Studio工具
设备连接 (设备界面)

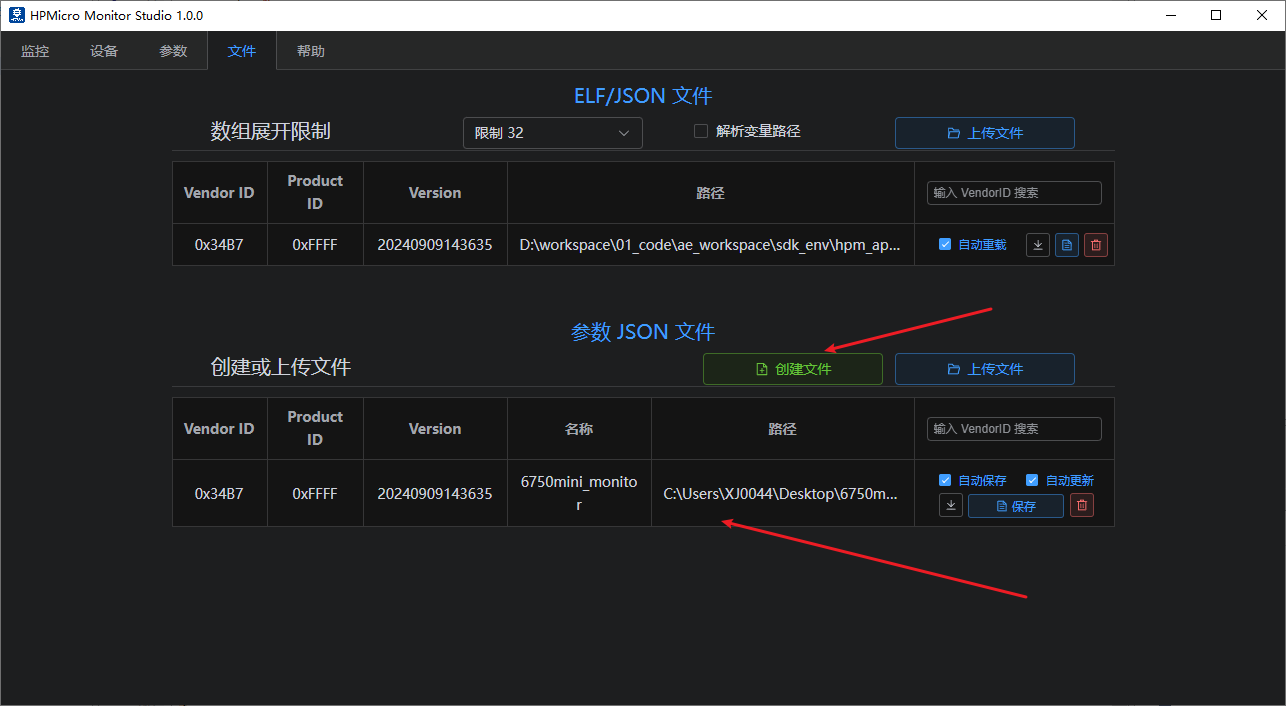
elf文件打开 (文件界面)
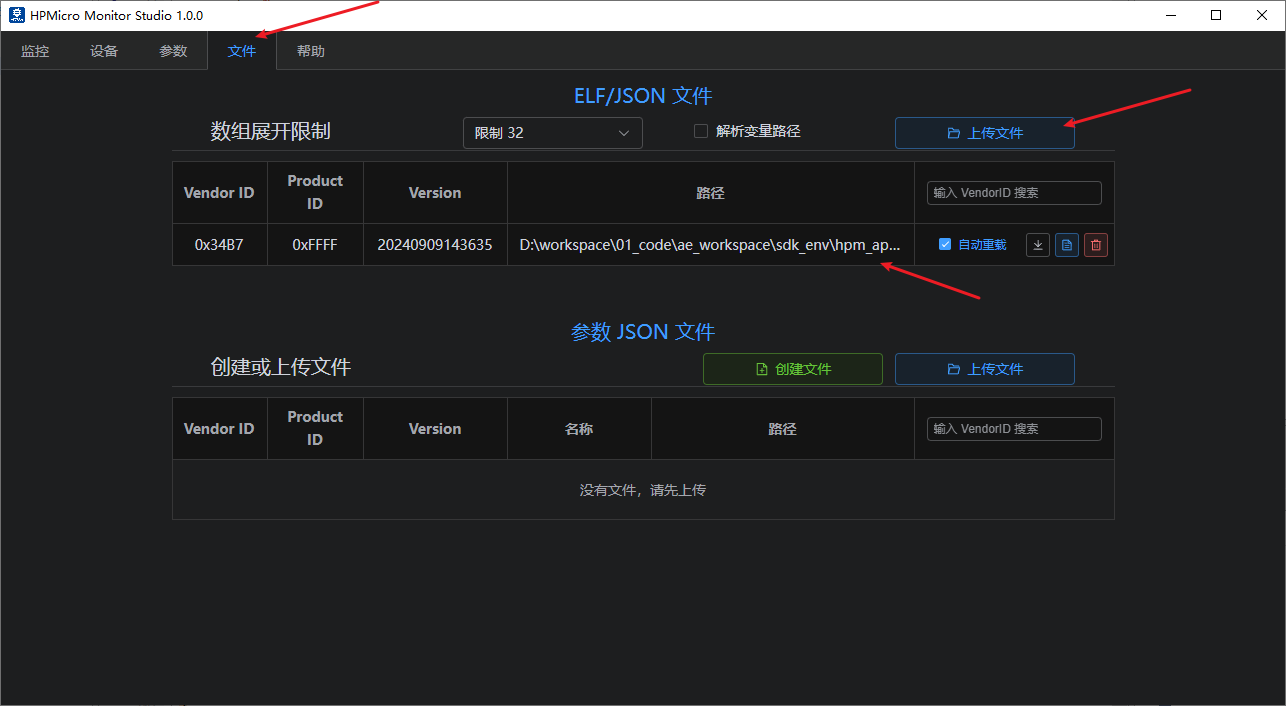
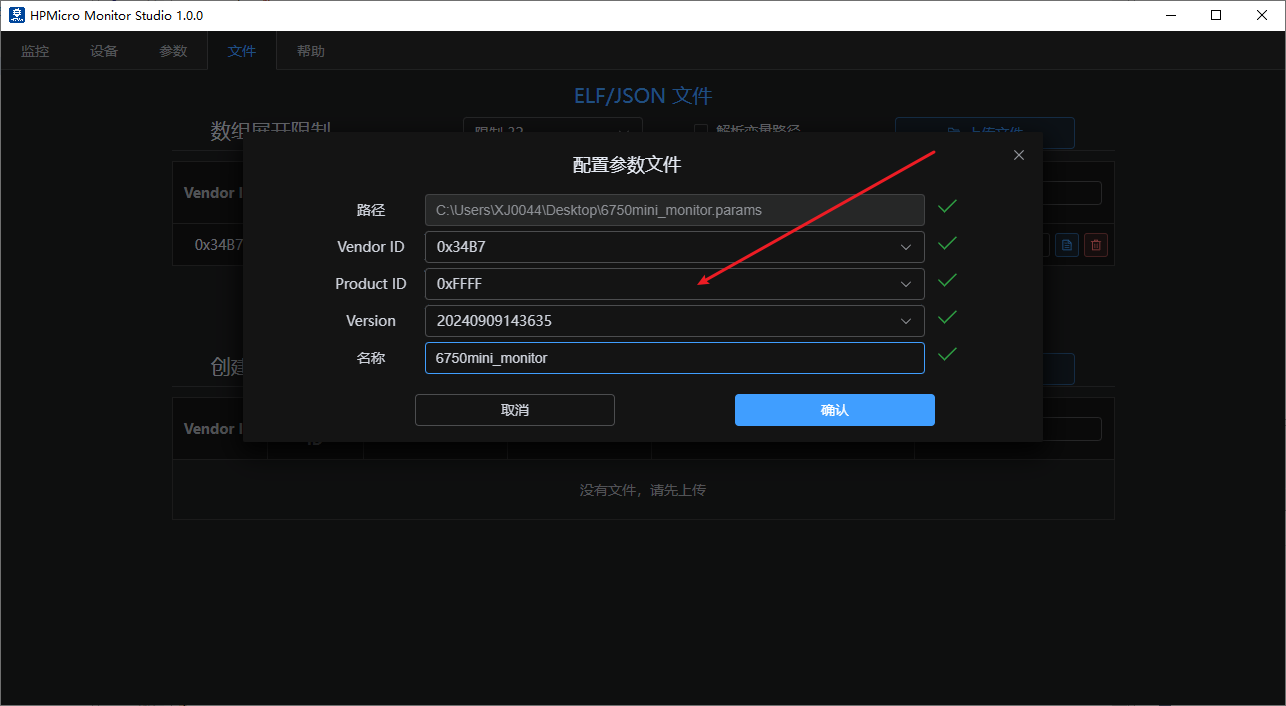
参数文件创建 (文件界面)
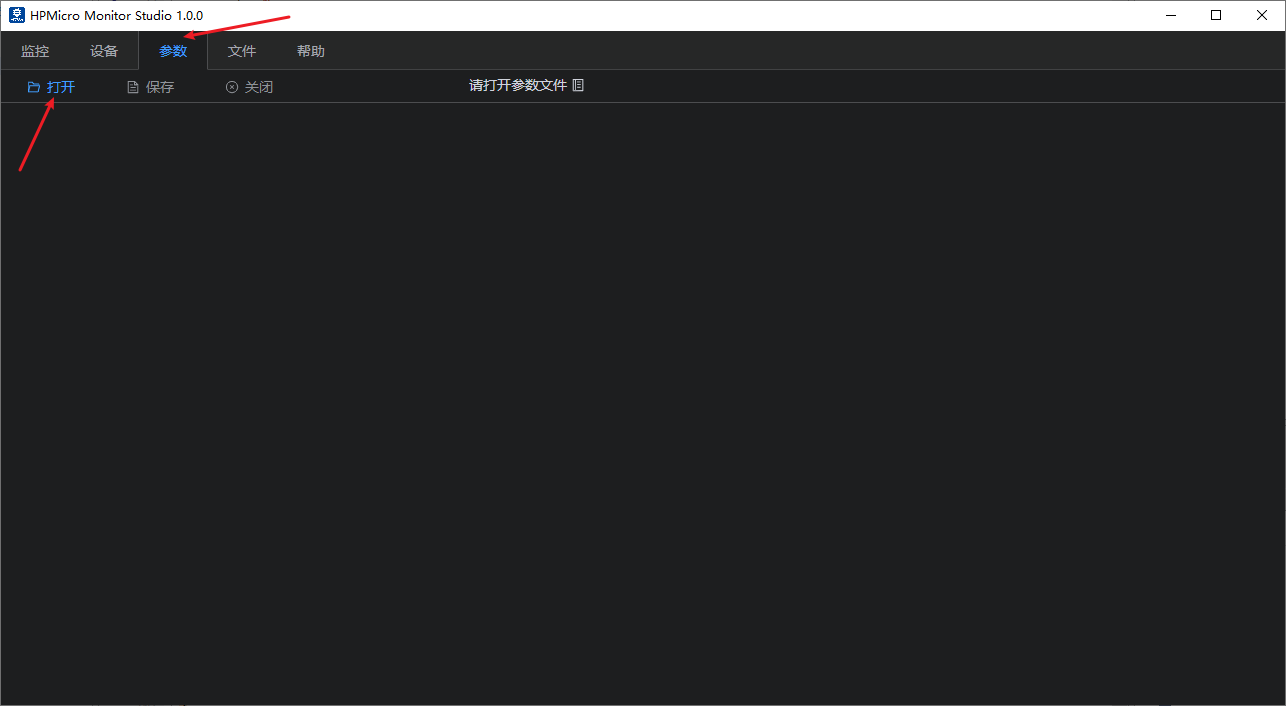
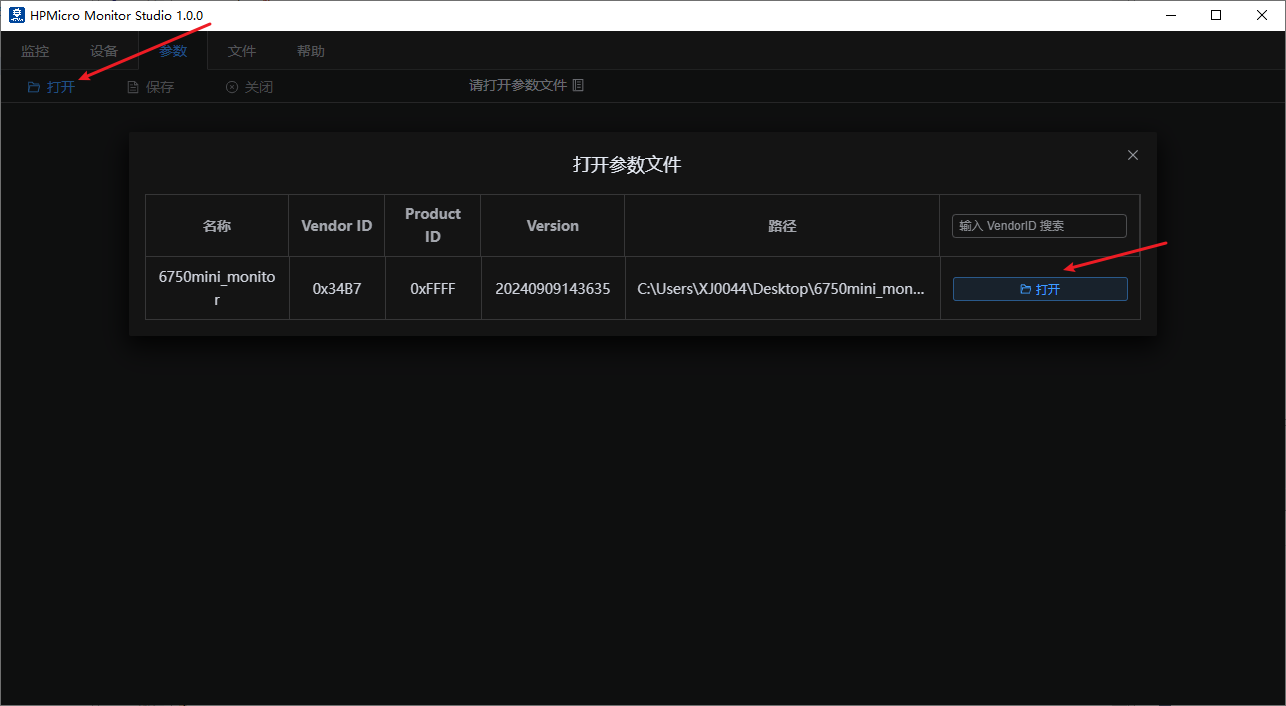
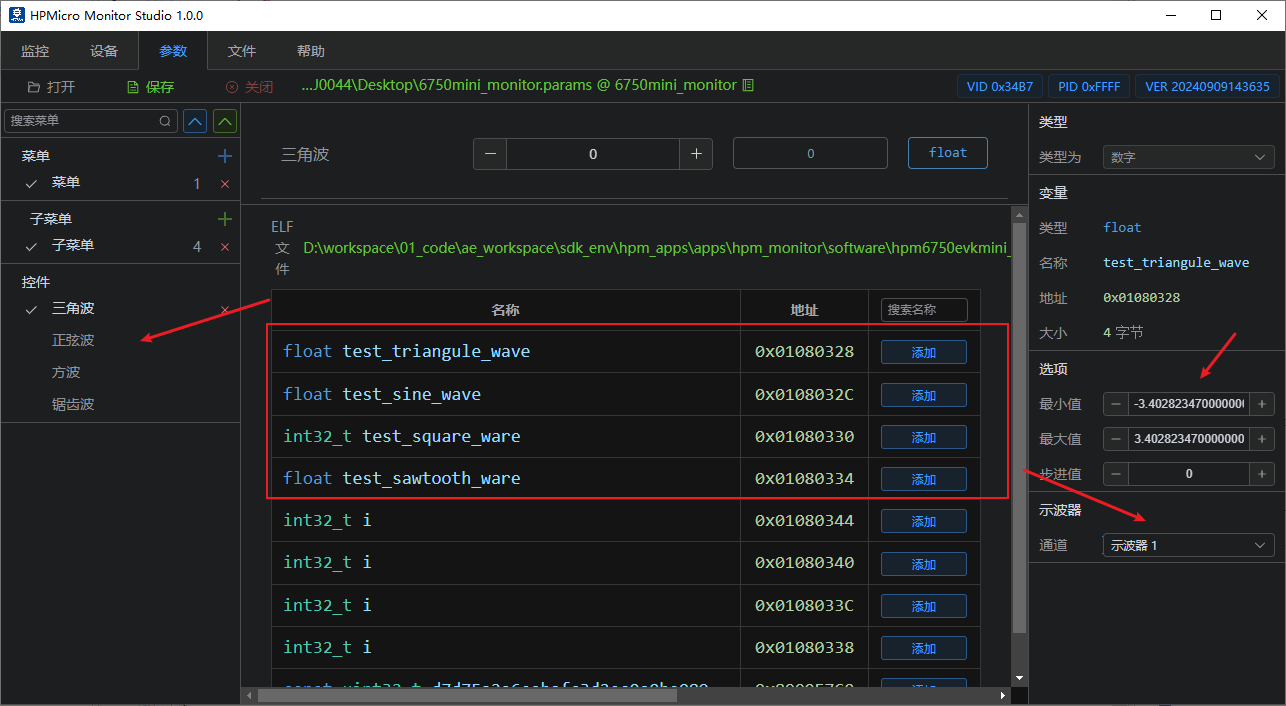
参数设置(参数界面) 打开参数文件
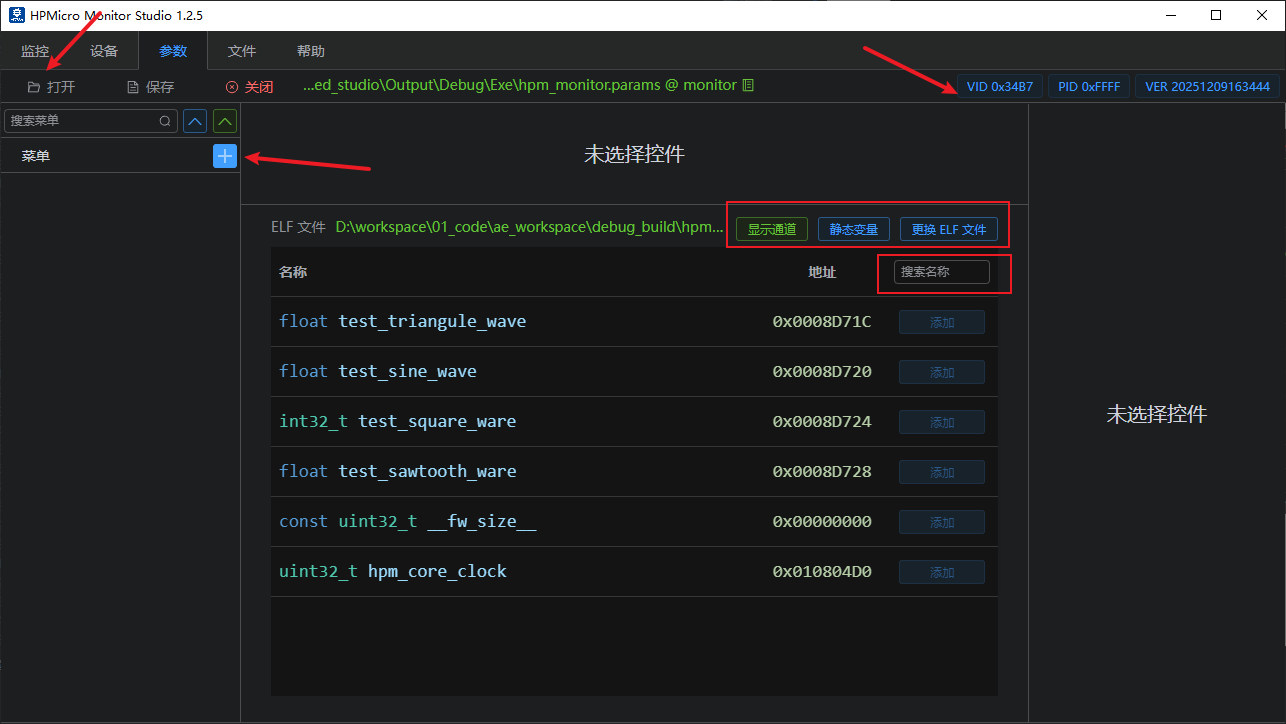
默认会列出所有的非静态的全局变量;注意:会自动过滤掉monitor服务相关的全局变量。 显示通道:点击后会显示用户自定义的通道参数; 静态变量:点击后展示参数树,选择要使能显示的文件即可。
界面设置(参数界面) 创建主菜单和子菜单(菜单名称可任意命名)。 例如:多轴电机可根据需求设置。如下3D打印。
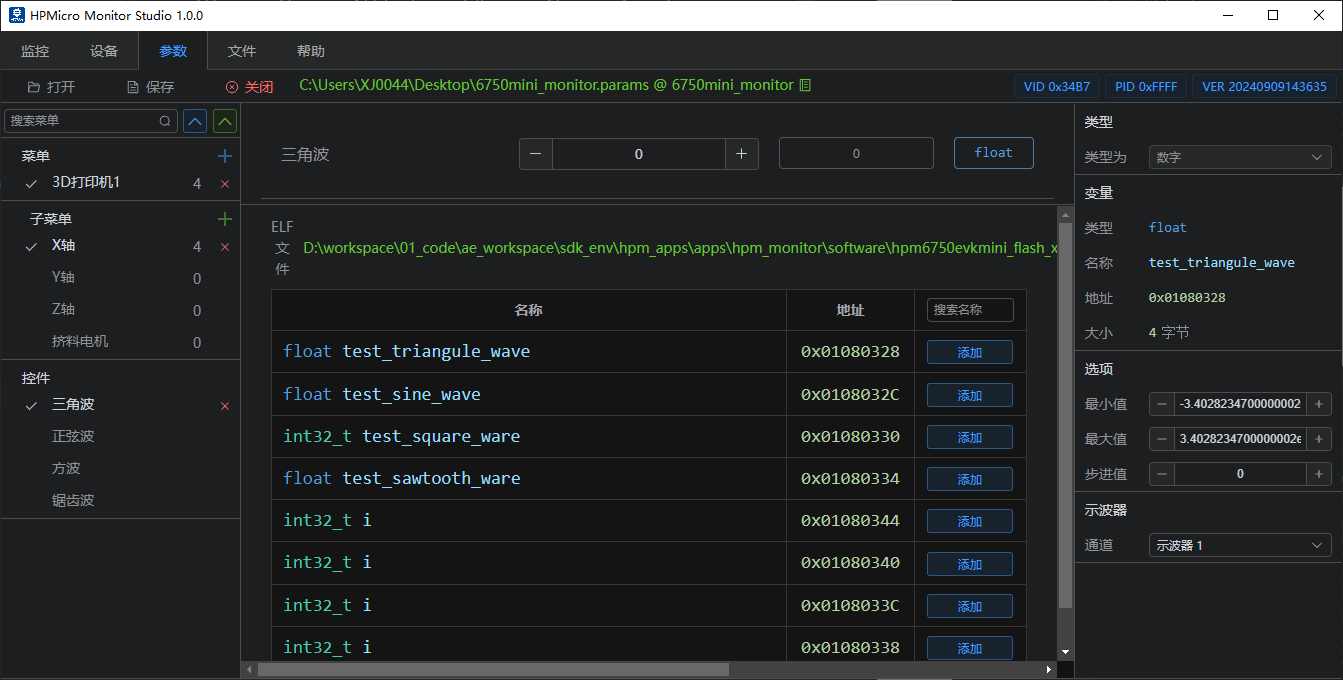
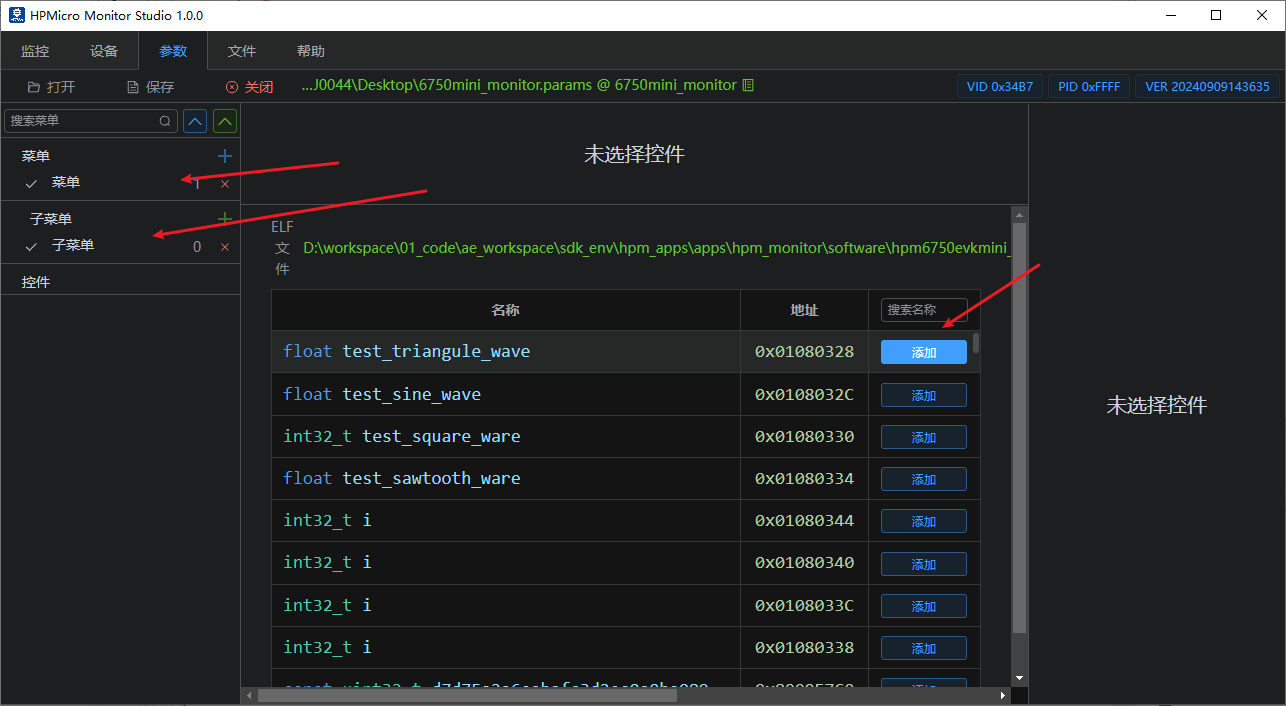
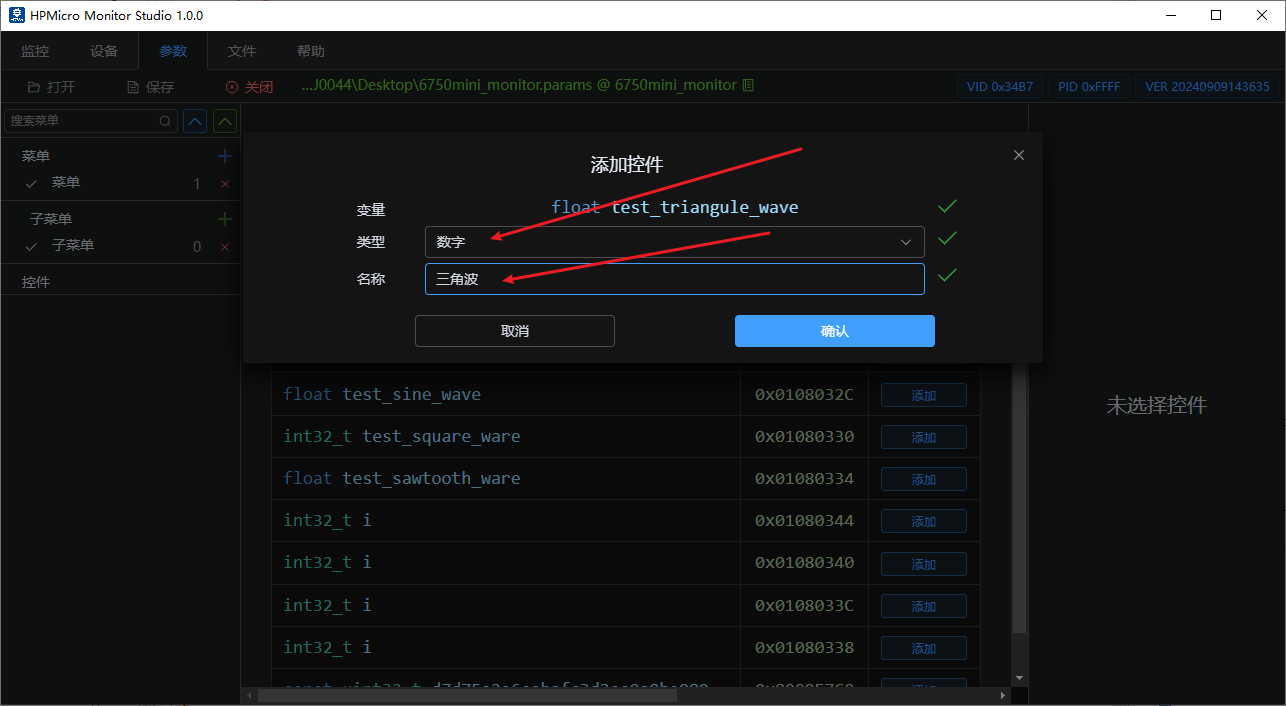
参数选择添加(参数界面) 选择需要监控或设置的全局变量,并根据需求选择合适的参数控件。
注:如需变量观测波形,需将对应变量添加到示波器窗口。最多支持4示波器窗口显示。
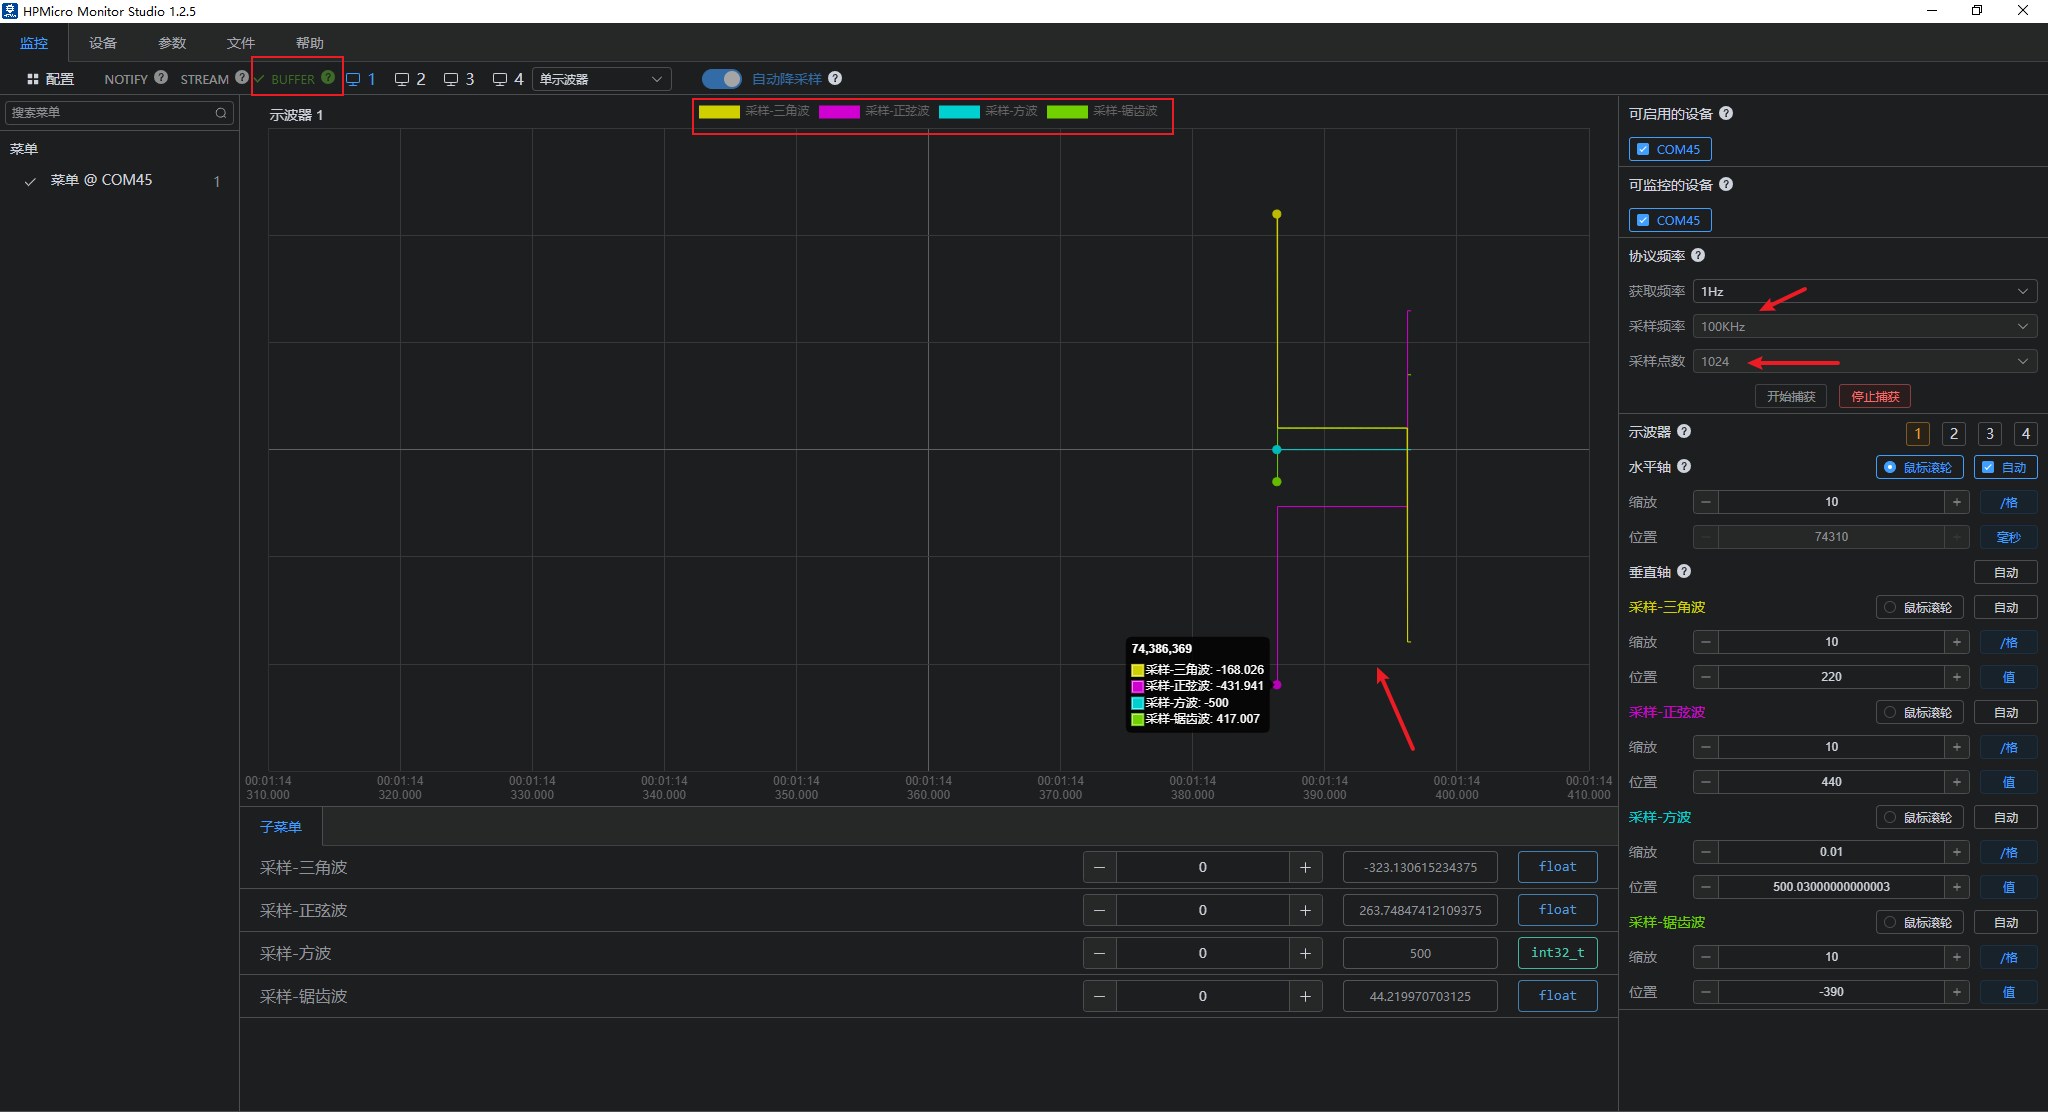
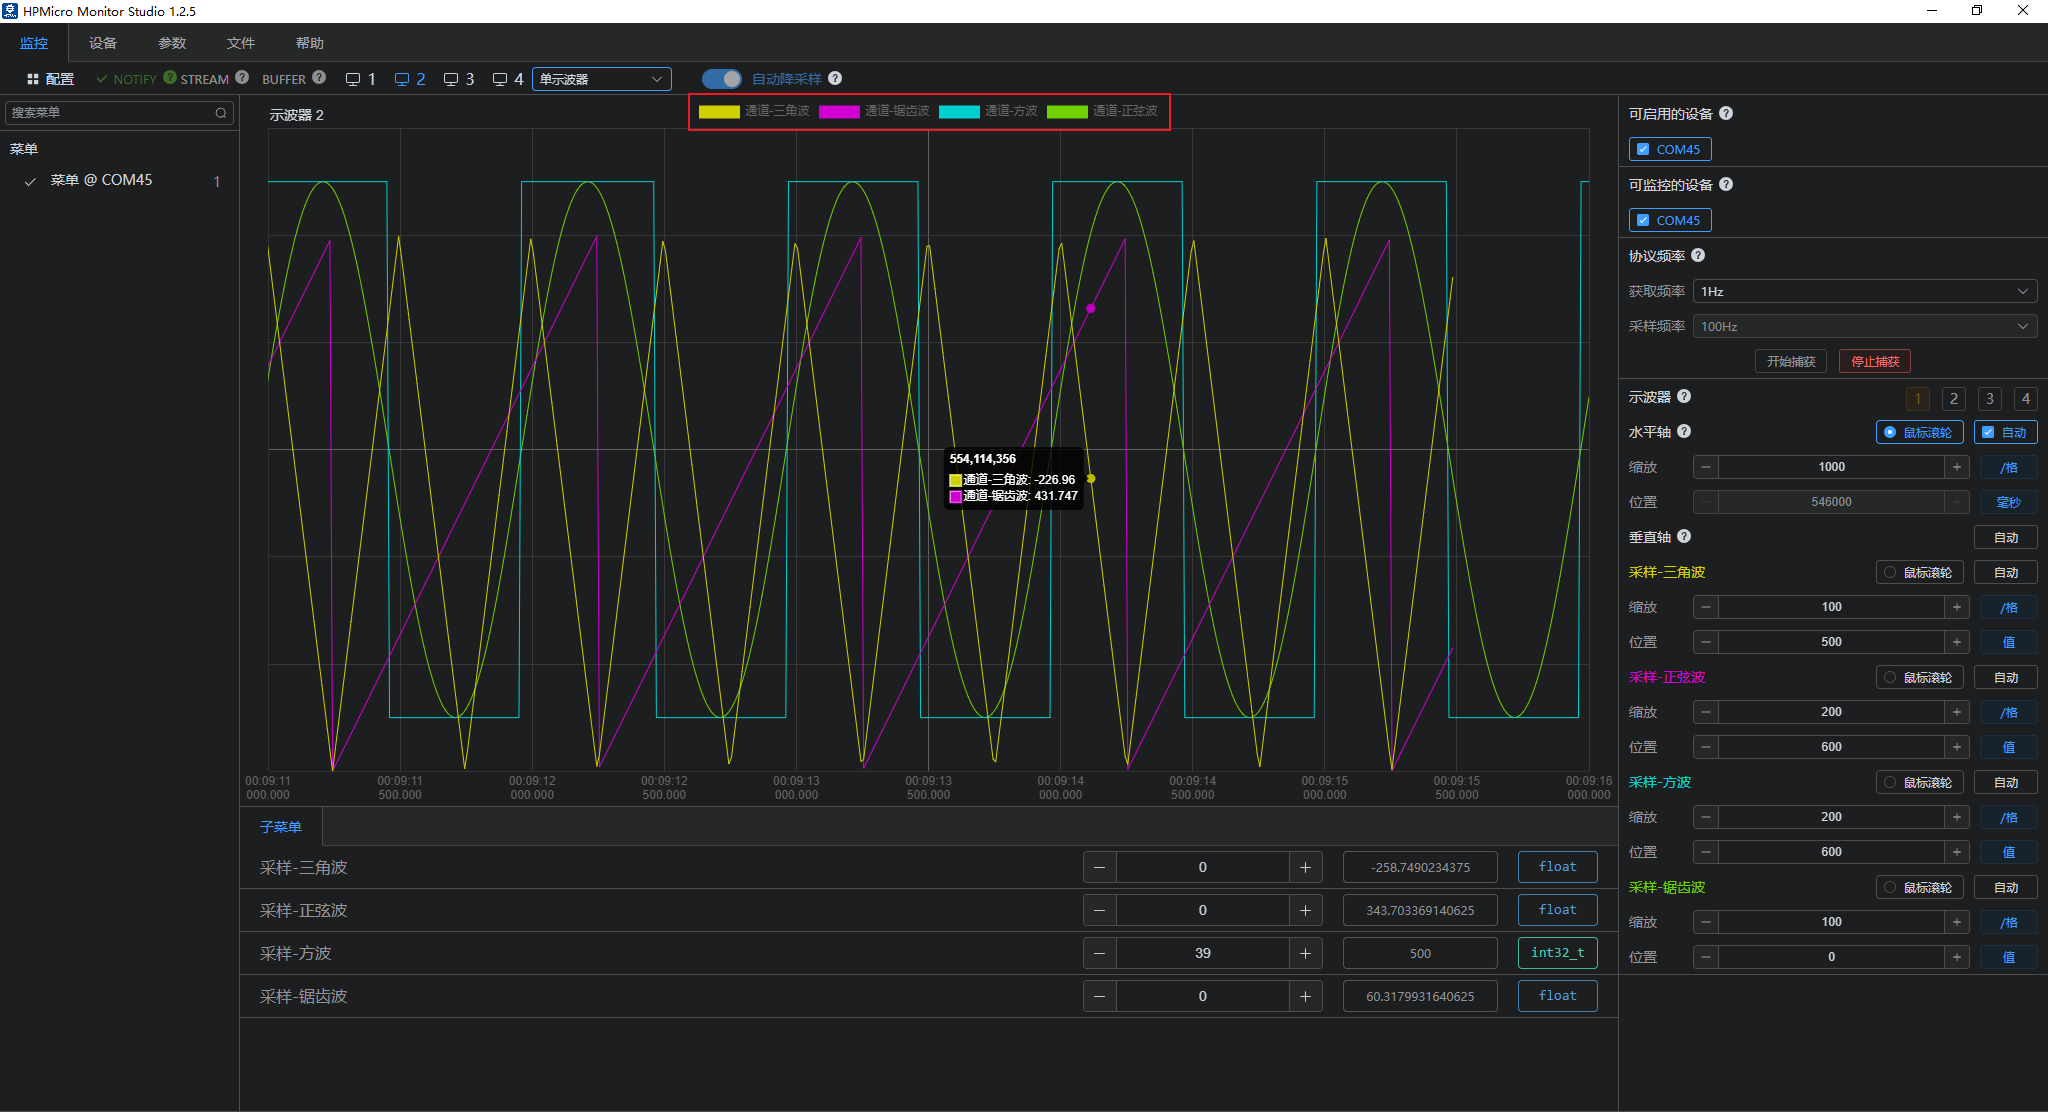
数据监控(监控界面) 使能可用的设备连接monitor通信;
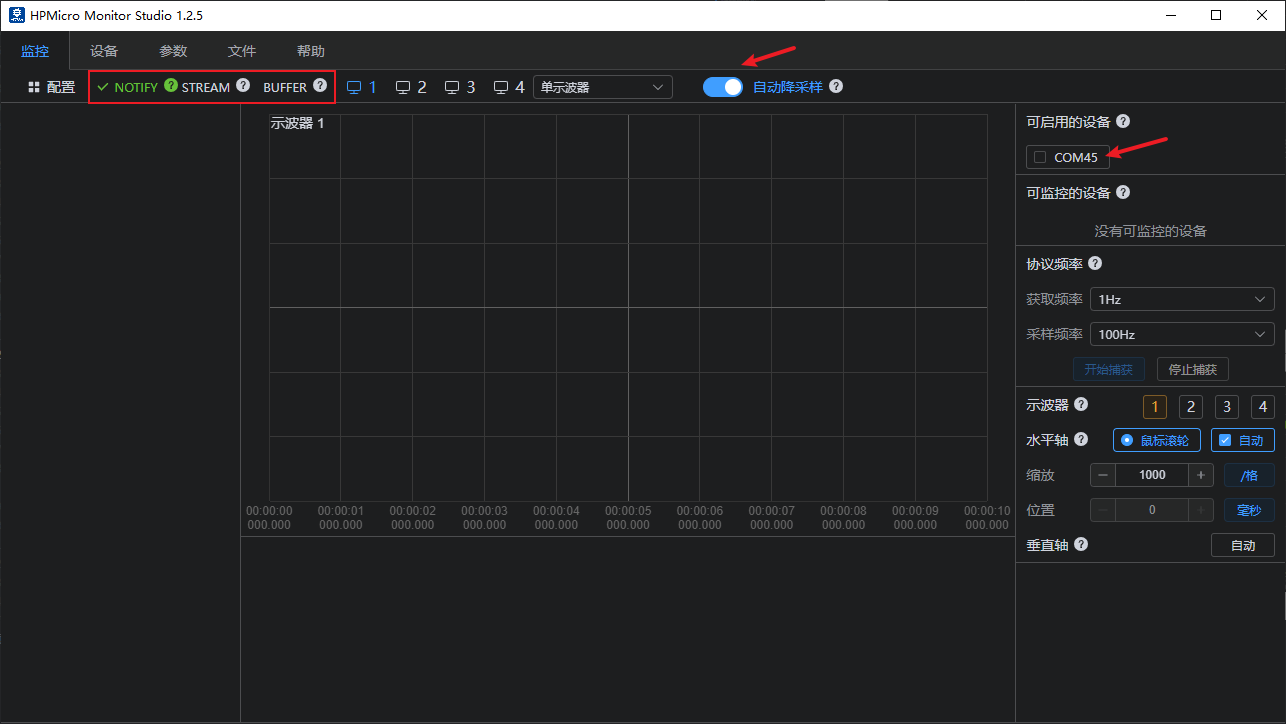
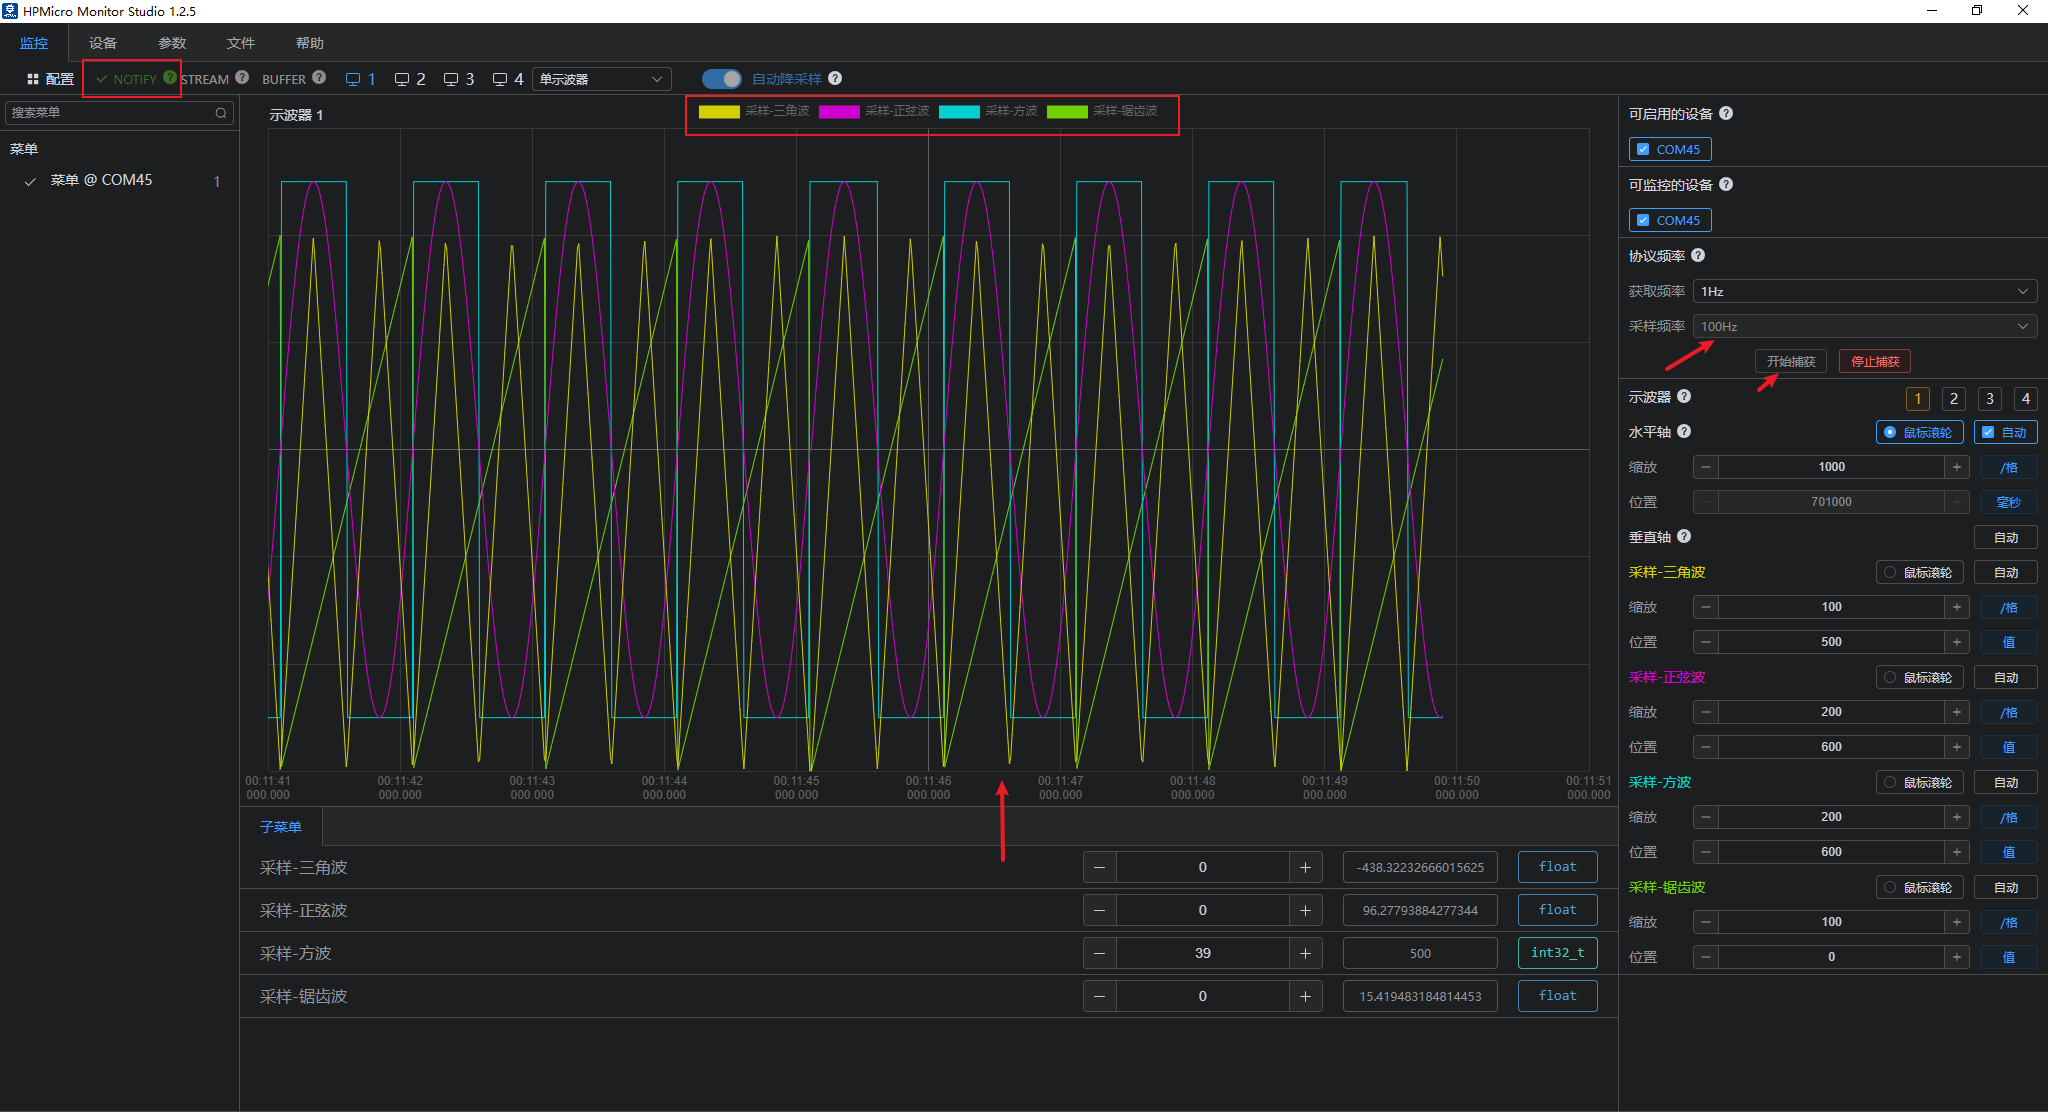
支持Notify采样模式
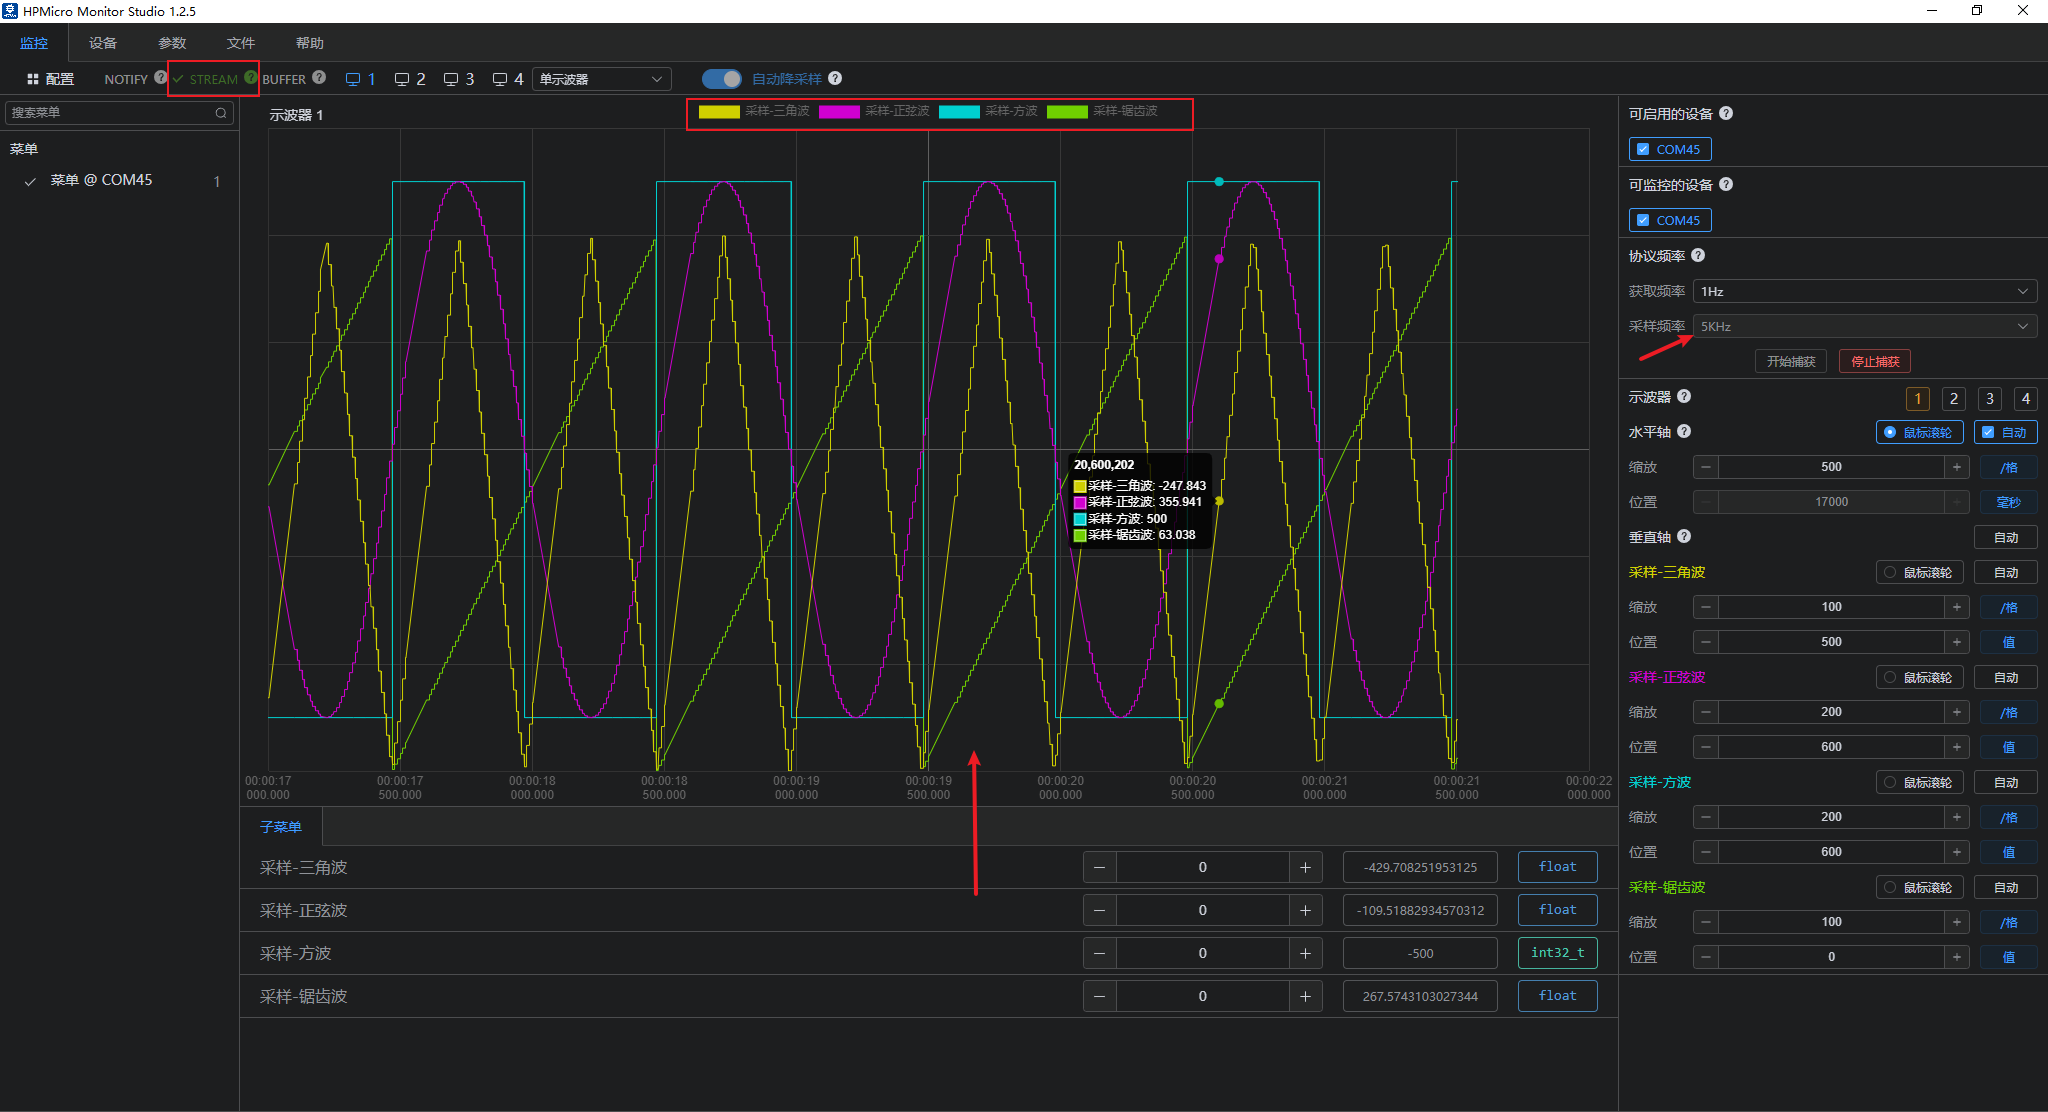
支持Stream采样模式
支持Buffer采样模式
支持自动降采样
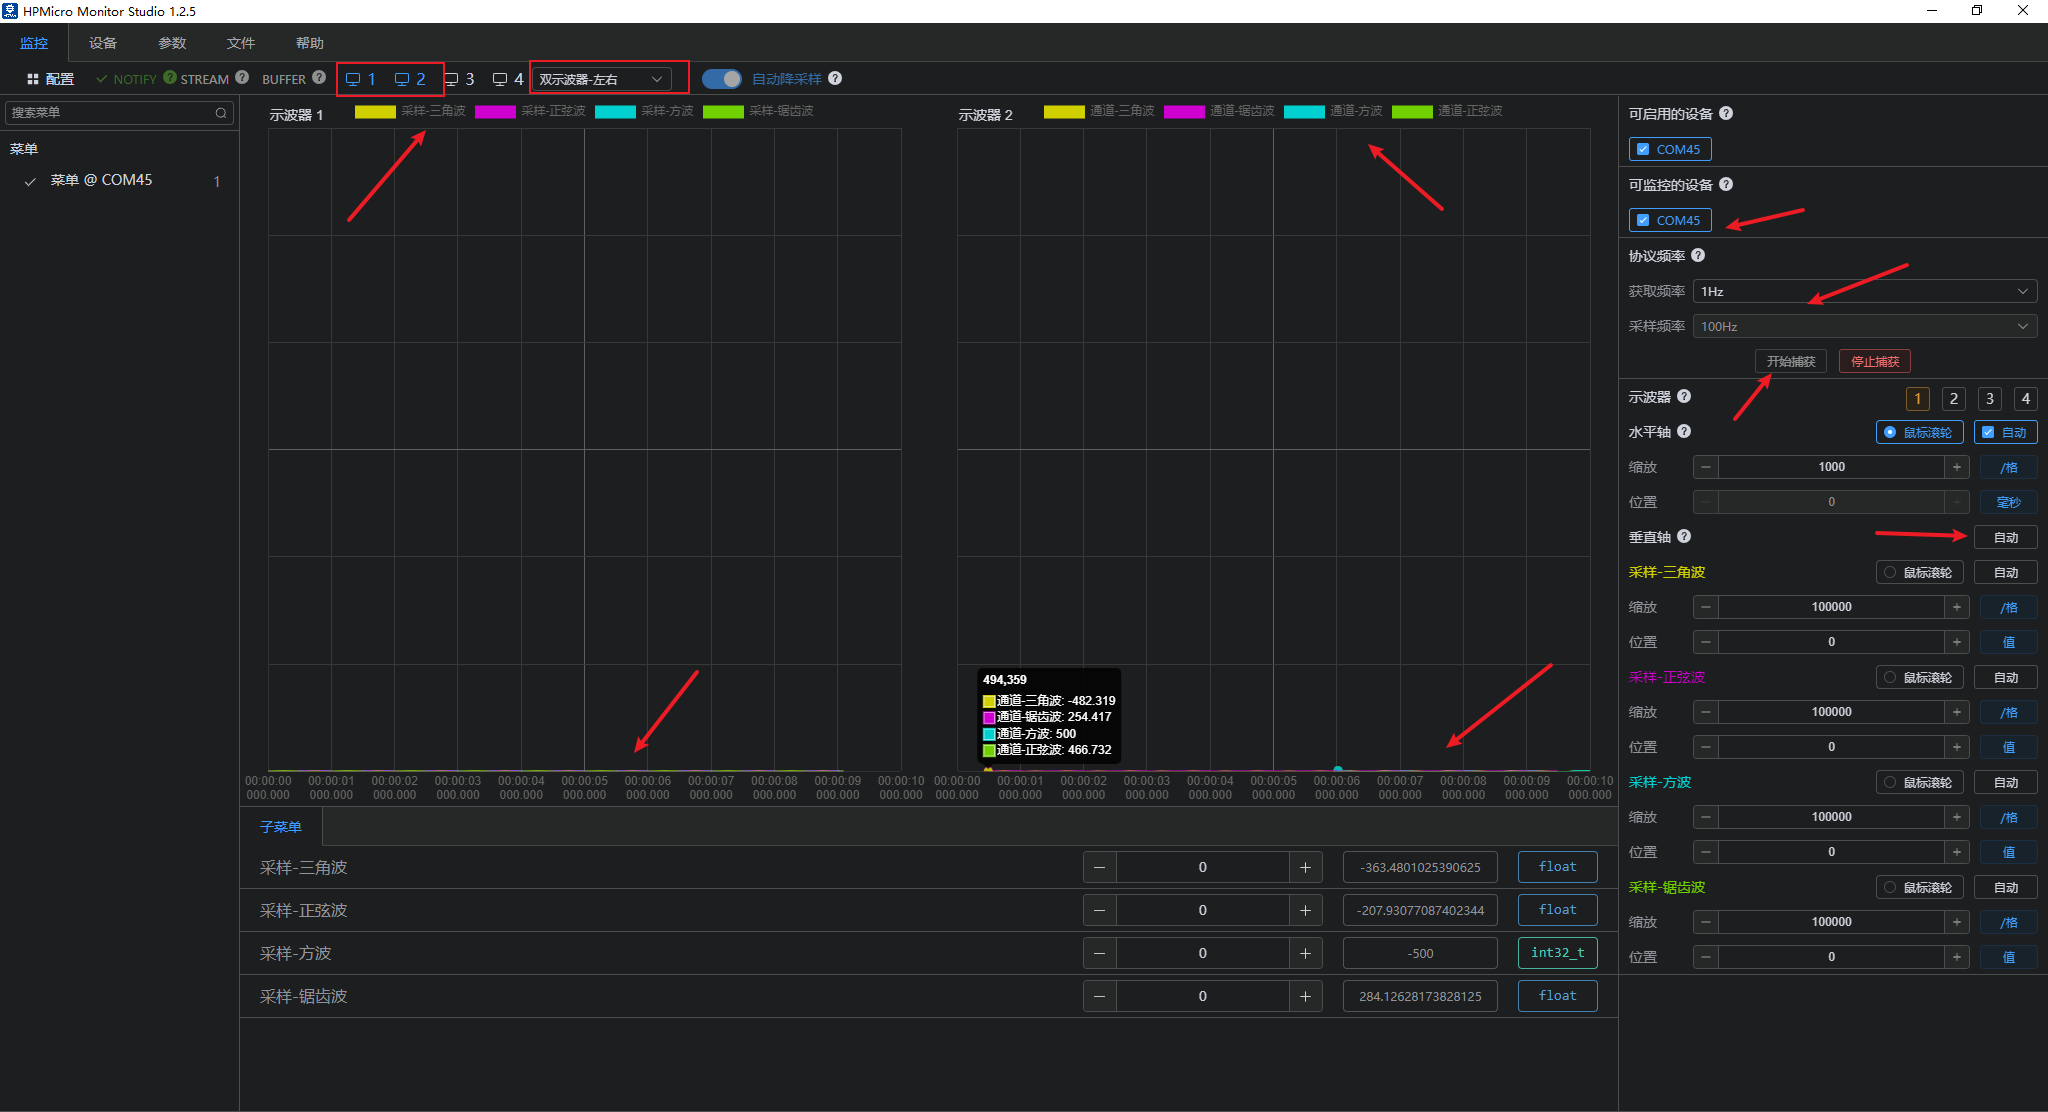
支持多示波器显示
支持通道显示和关闭
支持自动X轴或Y轴窗口显示 注意:刚开始采样时,由于不晓得各个波形的最大最小值,需要在采样一段时候后,手动点击自动后,即可将所有通道的波形自动铺满整个示波器窗口显示。
可设置上报频率和示波器窗口自动显示;

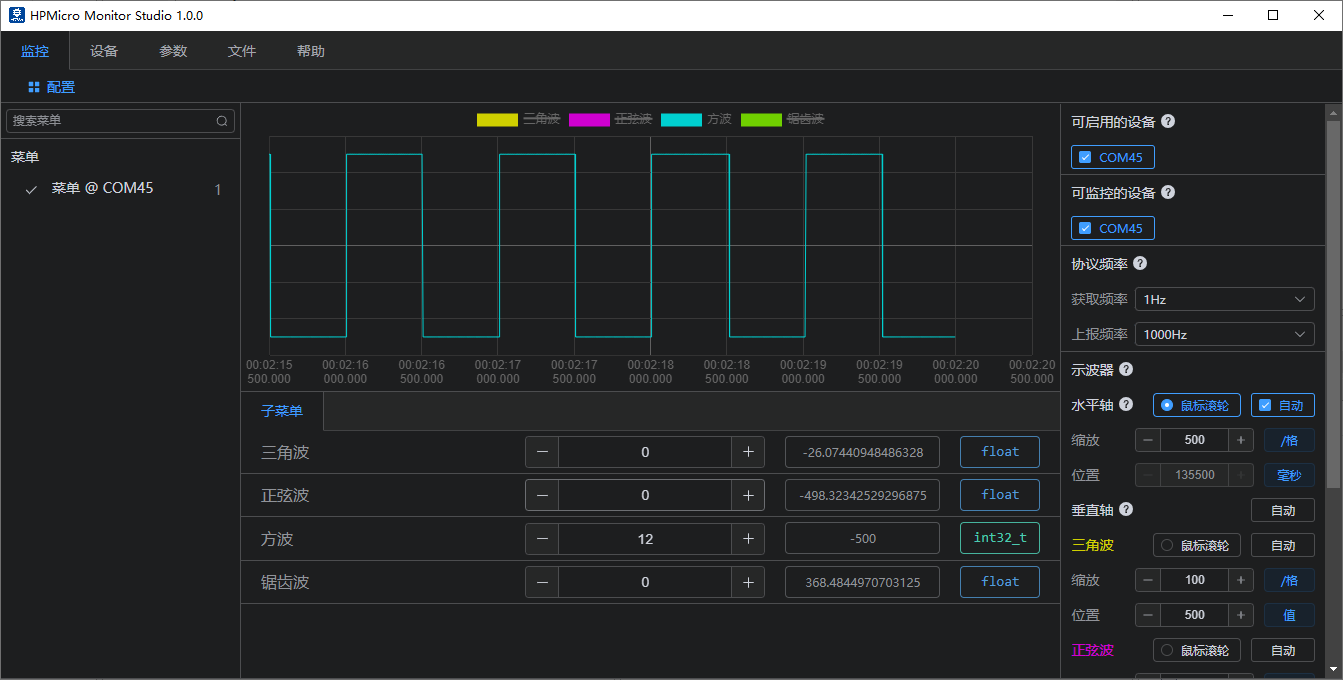
数据下发(监控界面) 子菜单里面的参数根据需要可设置下发修改当前参数值,如下方波修改后的波形显示及修改成功弹窗提醒;

波形效果(监控界面) 使能或禁用对应的波形显示; 正弦波:
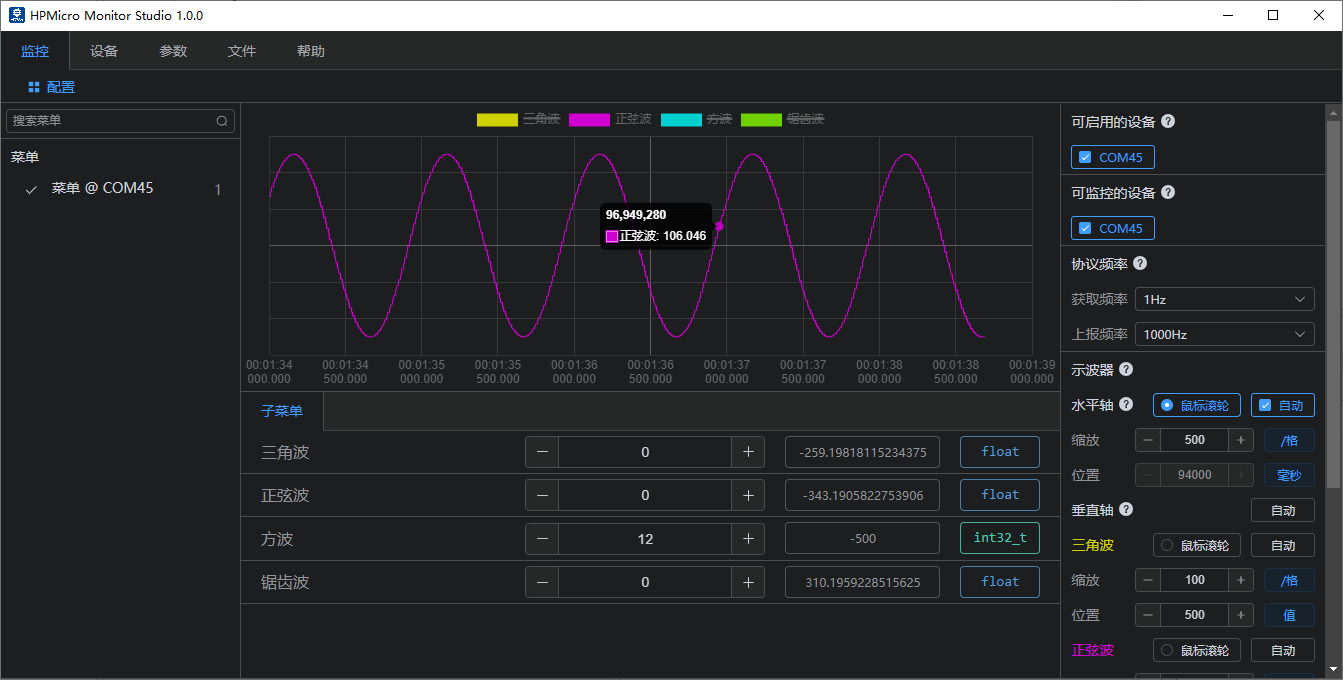
三角波:
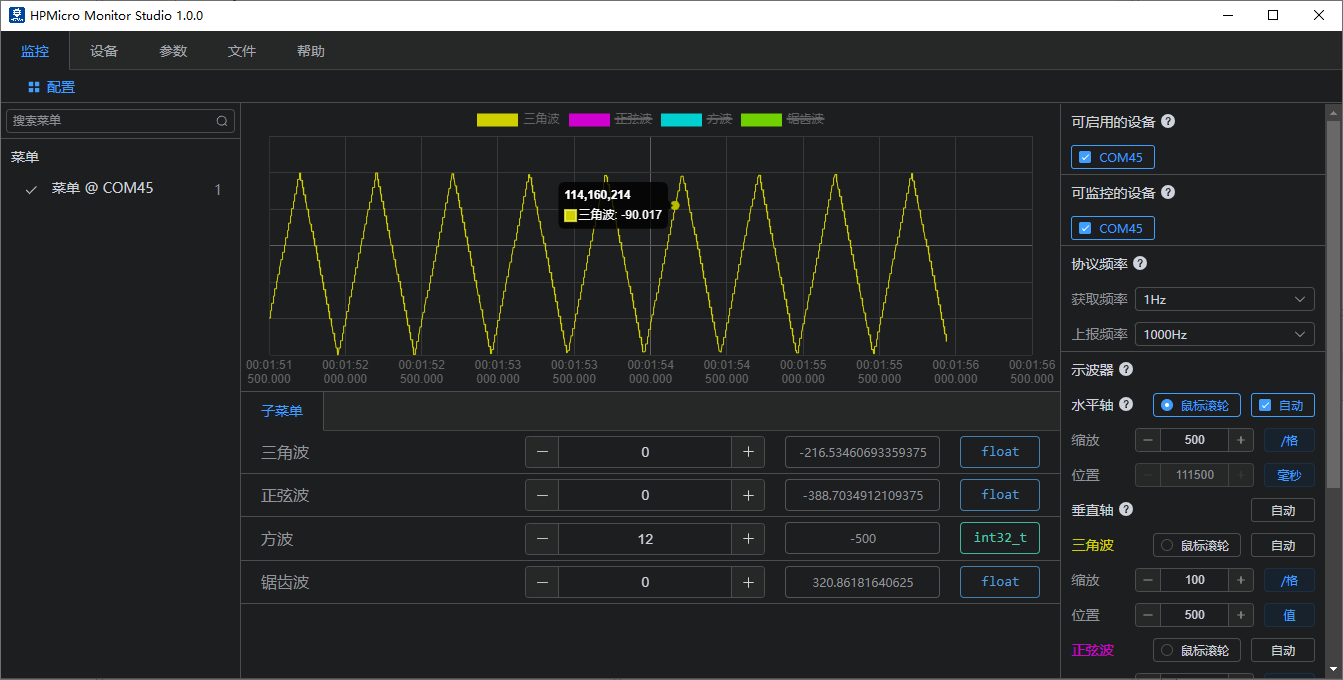
方波:
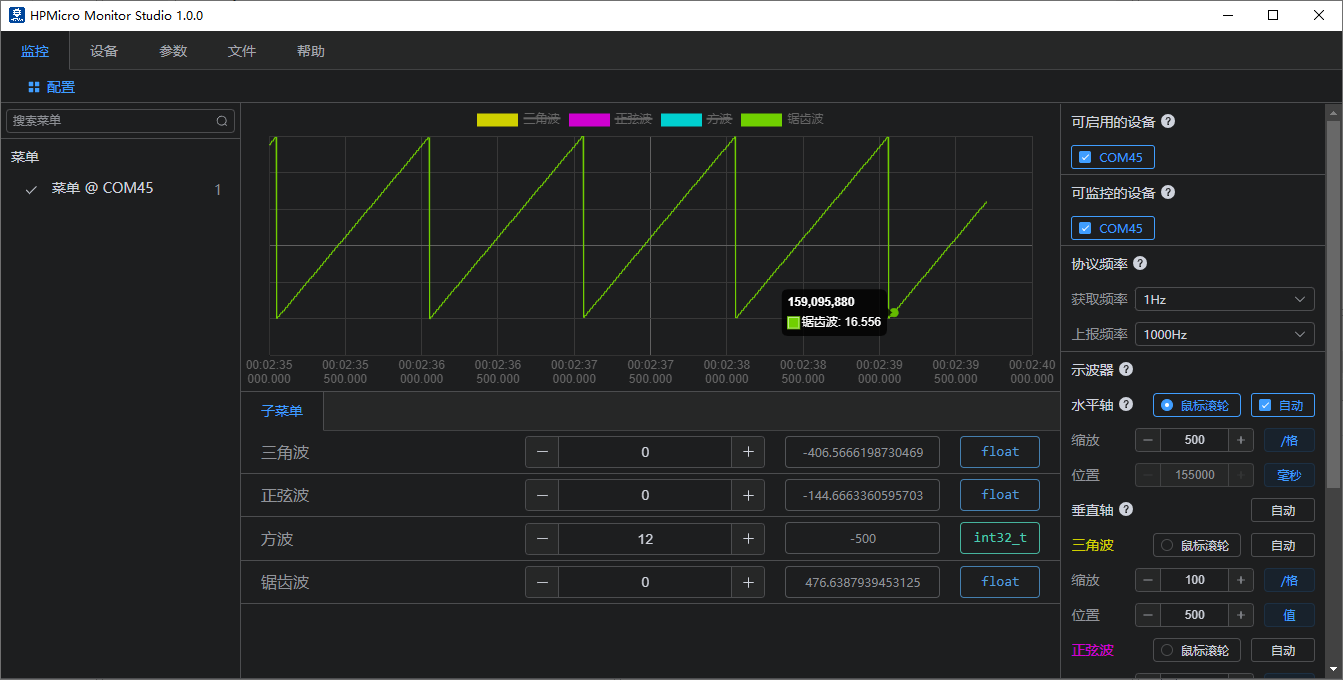
锯齿波:
用户自定义通道上报 用于自定义通道上报:
Notify模式采样
Stream模式采样
Buffer模式采样